Come Costruire una Rete WiFi Campus: Una Guida IT per l'Università
Questa guida tecnica fornisce un progetto completo per la progettazione e l'implementazione di reti WiFi campus ad alta densità, coprendo tutto, dalle indagini attive sul sito e il posizionamento degli access point all'architettura del controller, al roaming senza interruzioni e all'onboarding sicuro degli ospiti. È stata scritta per IT manager, architetti di rete e CTO di università e grandi sedi che necessitano di indicazioni pratiche per pianificare ed eseguire un'implementazione wireless in questo trimestre. La guida mappa anche la piattaforma Guest WiFi e di analisi di Purple a punti di integrazione reali all'interno del ciclo di vita dell'implementazione.
Listen to this guide
View podcast transcript
Riepilogo Esecutivo
Per i team IT universitari e gli operatori di sedi, una rete WiFi campus non è più un servizio aggiuntivo, ma un'infrastruttura critica. Gli ambienti moderni dell'istruzione superiore richiedono reti wireless ad alta densità e ad alta velocità, in grado di supportare più dispositivi per utente, applicazioni ad alto consumo di larghezza di banda e mobilità senza interruzioni su vaste aree fisiche. Questa guida delinea l'architettura tecnica, le strategie di implementazione e le migliori pratiche operative necessarie per costruire una rete wireless campus resiliente. Ci concentriamo sull'implementazione pratica — dalla pianificazione RF e la selezione degli access point (AP) all'architettura del controller e all'onboarding sicuro — assicurando che la vostra implementazione offra ROI, conformità e un'esperienza utente senza attriti. Che si tratti di un'implementazione in un singolo edificio o in una proprietà multi-sito, i principi qui si applicano ugualmente agli ambienti Hospitality , Retail , Healthcare e Transport .
Approfondimento Tecnico: Architettura e Standard
La costruzione di una rete wireless campus richiede un approccio strutturato alla topologia e l'adesione agli standard wireless moderni. Le decisioni prese nella fase di architettura determinano la scalabilità, la sicurezza e le prestazioni di tutto ciò che segue.
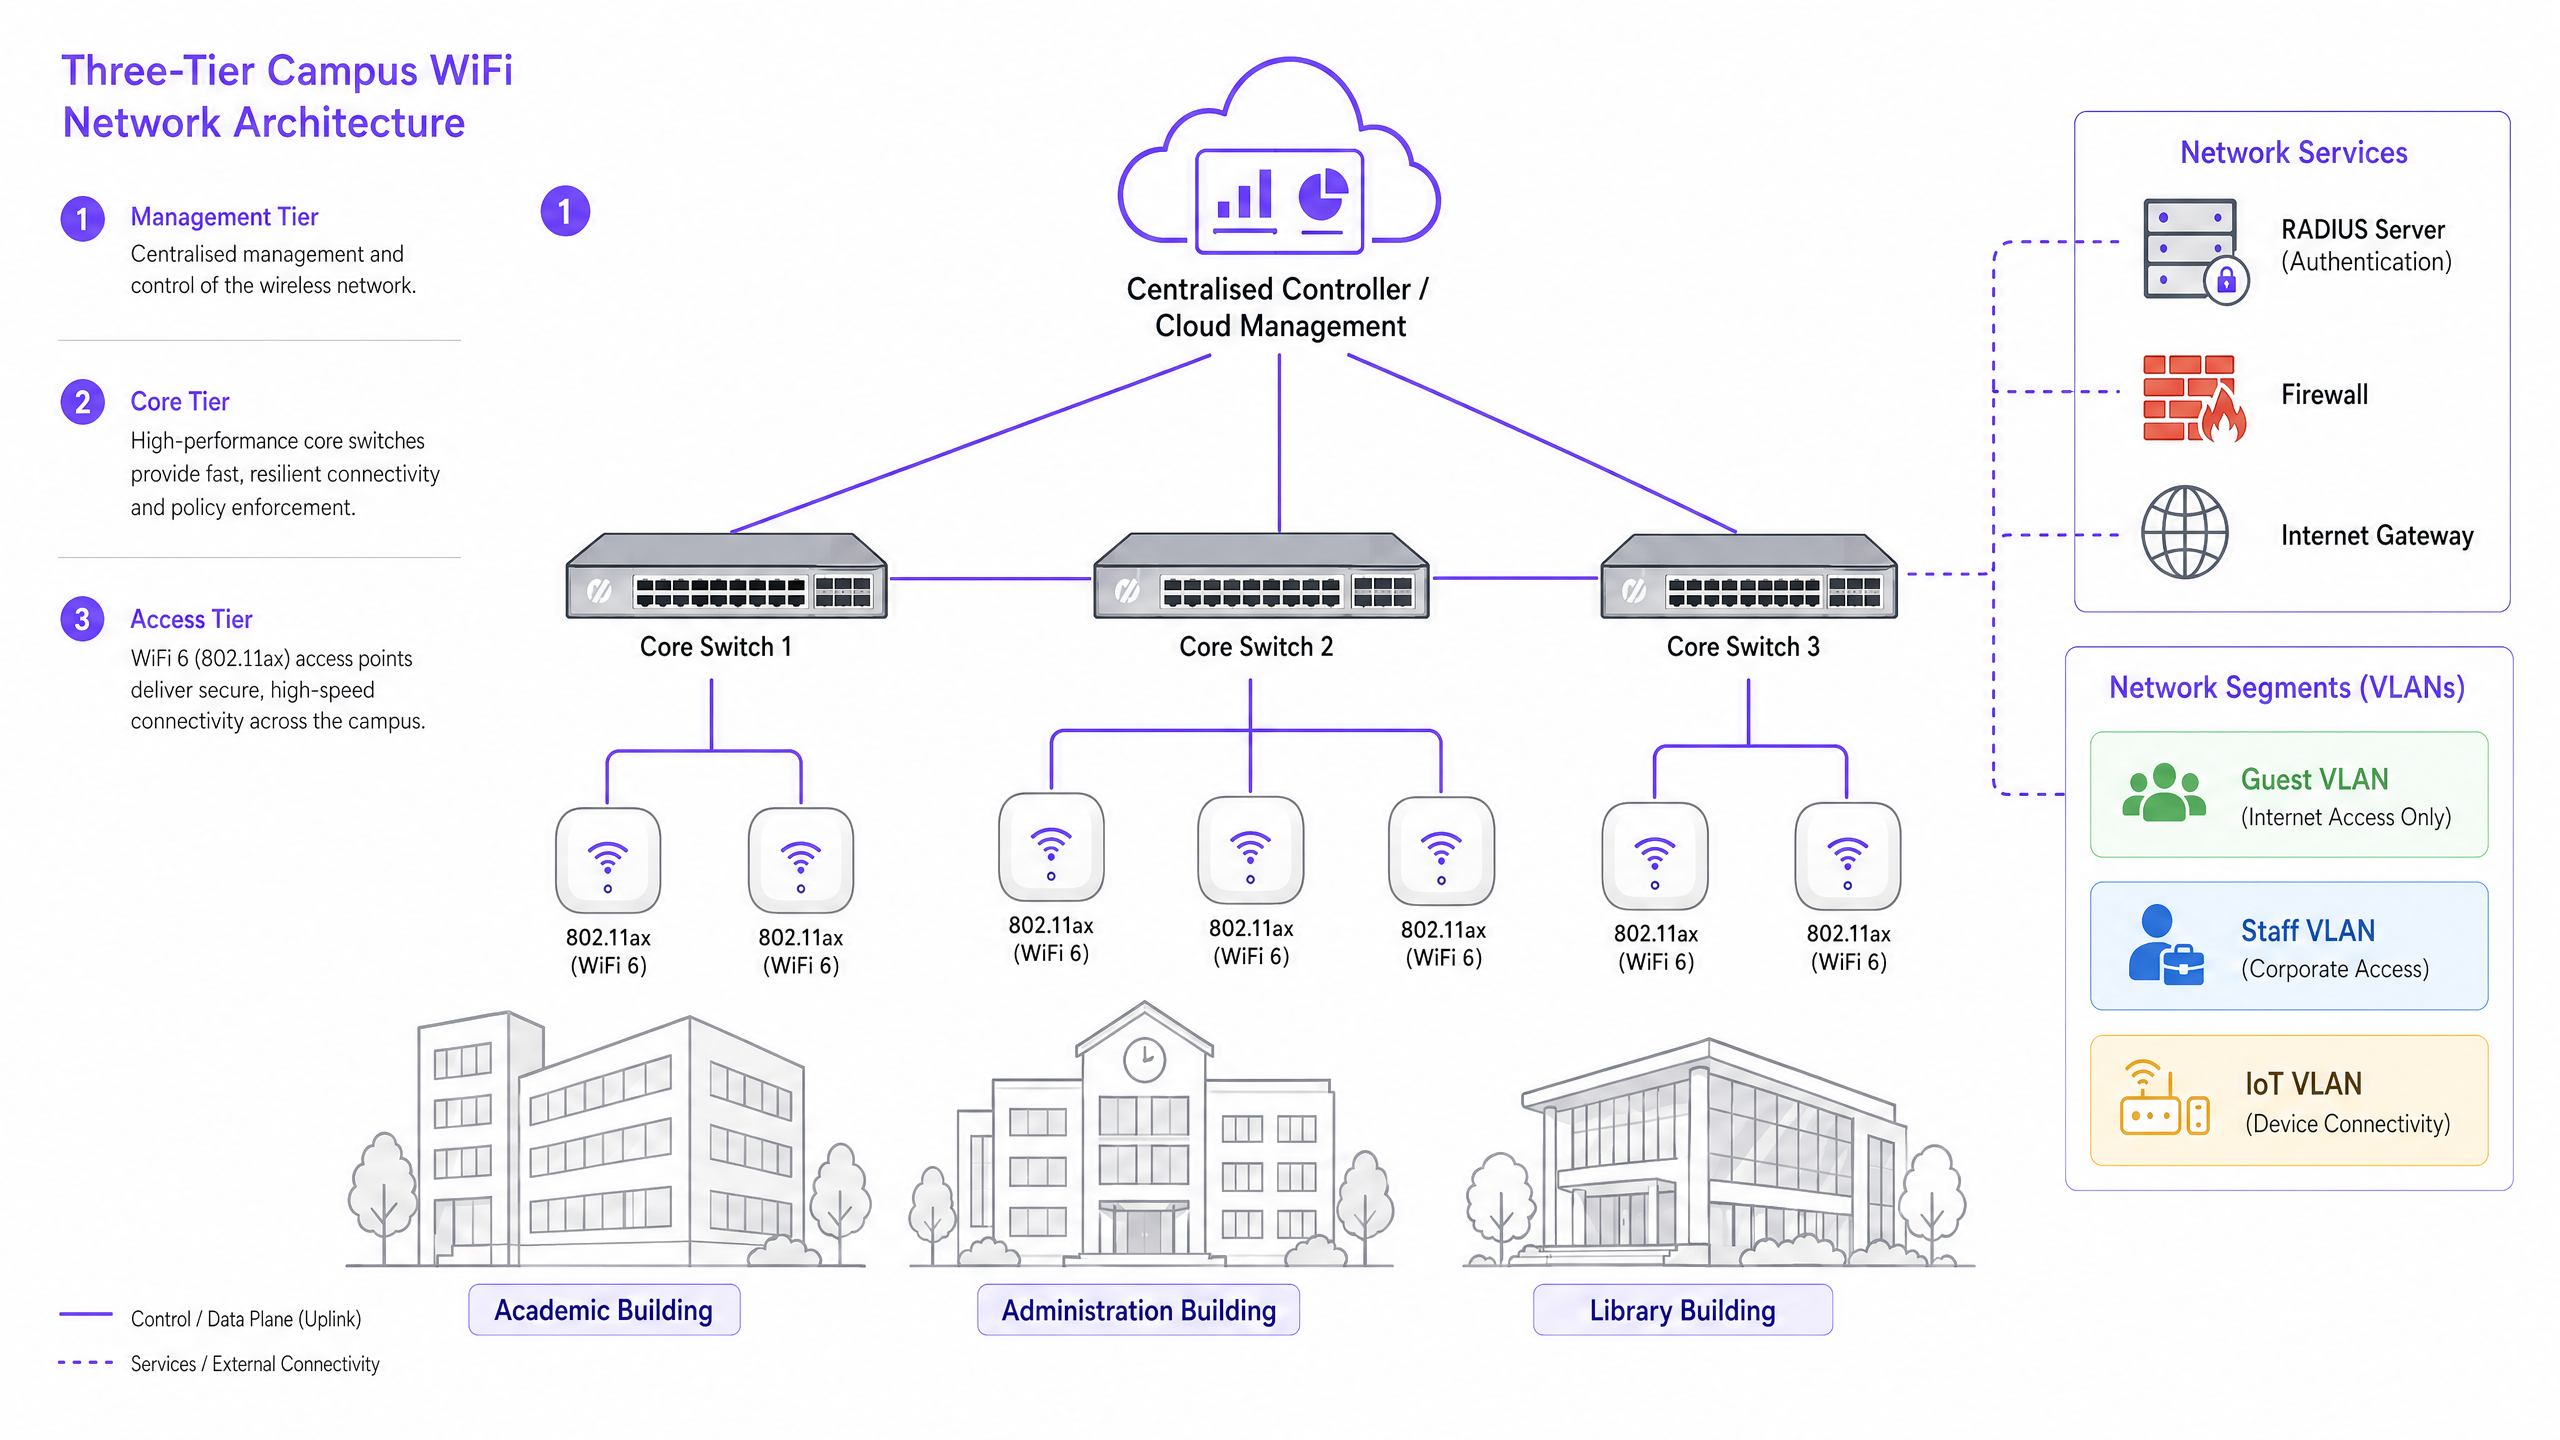
L'Architettura a Tre Livelli
Le reti campus aziendali impiegano un'architettura gerarchica a tre livelli per garantire scalabilità, resilienza e prestazioni. I tre livelli sono i seguenti:
Livello di Gestione/Core: Il sistema nervoso centrale della rete. Questo include switch di routing core ad alta capacità e il controller WLAN centrale — sia on-premise che gestito in cloud. Il controller gestisce la gestione RF, i passaggi di roaming, l'applicazione delle politiche globali e la gestione del firmware su tutti gli access point. I controller gestiti in cloud sono diventati la scelta dominante per le nuove implementazioni, semplificando la gestione multi-sito e riducendo i costi hardware on-premise.
Livello di Distribuzione: Aggrega il traffico dal livello di accesso, applicando politiche di routing e garantendo la ridondanza prima di passare i dati al core. Nei campus più piccoli, questo livello è spesso integrato nel core.
Livello di Accesso: Il bordo della rete, comprendente switch edge Power over Ethernet Plus (PoE+) e gli Access Point (AP) wireless stessi. Per le nuove implementazioni, PoE+ è lo standard minimo, poiché gli access point WiFi 6 consumano molta più energia rispetto ai loro predecessori.
Standard e Frequenze Wireless
Le implementazioni moderne dovrebbero standardizzarsi su 802.11ax (WiFi 6) o WiFi 6E. WiFi 6 introduce funzionalità critiche ad alta densità, tra cui l'Orthogonal Frequency-Division Multiple Access (OFDMA), che consente a un singolo AP di servire più client contemporaneamente su sottocanali, e il Target Wake Time (TWT), che riduce il consumo della batteria sui dispositivi IoT. WiFi 6E estende queste capacità nella banda 6GHz, offrendo uno spettro contiguo massiccio privo di interferenze da dispositivi legacy — un vantaggio significativo in ambienti ad alta densità come aule magne e sale conferenze.
| Standard | Bande di Frequenza | Throughput Max | Caratteristica Chiave | Miglior Caso d'Uso |
|---|---|---|---|---|
| 802.11n (WiFi 4) | 2.4GHz / 5GHz | 600 Mbps | MIMO | Solo supporto legacy |
| 802.11ac (WiFi 5) | 5GHz | 3.5 Gbps | MU-MIMO | Implementazioni esistenti |
| 802.11ax (WiFi 6) | 2.4GHz / 5GHz | 9.6 Gbps | OFDMA, TWT | Nuove implementazioni campus |
| 802.11ax (WiFi 6E) | 2.4 / 5 / 6GHz | 9.6 Gbps | Spettro 6GHz | Alta densità, a prova di futuro |
Sicurezza e Autenticazione
La sicurezza deve essere a più livelli. Per il personale e gli studenti iscritti, l'autenticazione 802.1X/EAP collegata al provider di identità dell'università (Active Directory, LDAP o un servizio di identità cloud) è obbligatoria. Questo fornisce un accesso crittografato basato su credenziali che soddisfa i requisiti di standard come ISO 27001 e Cyber Essentials. Per gli utenti temporanei — accademici in visita, delegati a conferenze e membri del pubblico — è richiesto un captive portal sicuro. L'integrazione di una robusta soluzione Guest WiFi garantisce un onboarding conforme al GDPR, pagine splash personalizzabili e la capacità di raccogliere informazioni utili tramite WiFi Analytics . Tutto il traffico wireless dovrebbe essere crittografato utilizzando WPA3, lo standard attuale, che fornisce protezioni più forti contro gli attacchi a forza bruta rispetto al suo predecessore WPA2. Per una revisione completa della postura di sicurezza degli access point, consultate la nostra Access Point Security: Your 2026 Enterprise Guide .
Guida all'Implementazione: Dall'Indagine all'Implementazione
L'implementazione di una rete campus è un processo a fasi che richiede una pianificazione meticolosa prima che venga posato un singolo cavo o montato un AP.
Fase 1: L'Indagine Attiva del Sito
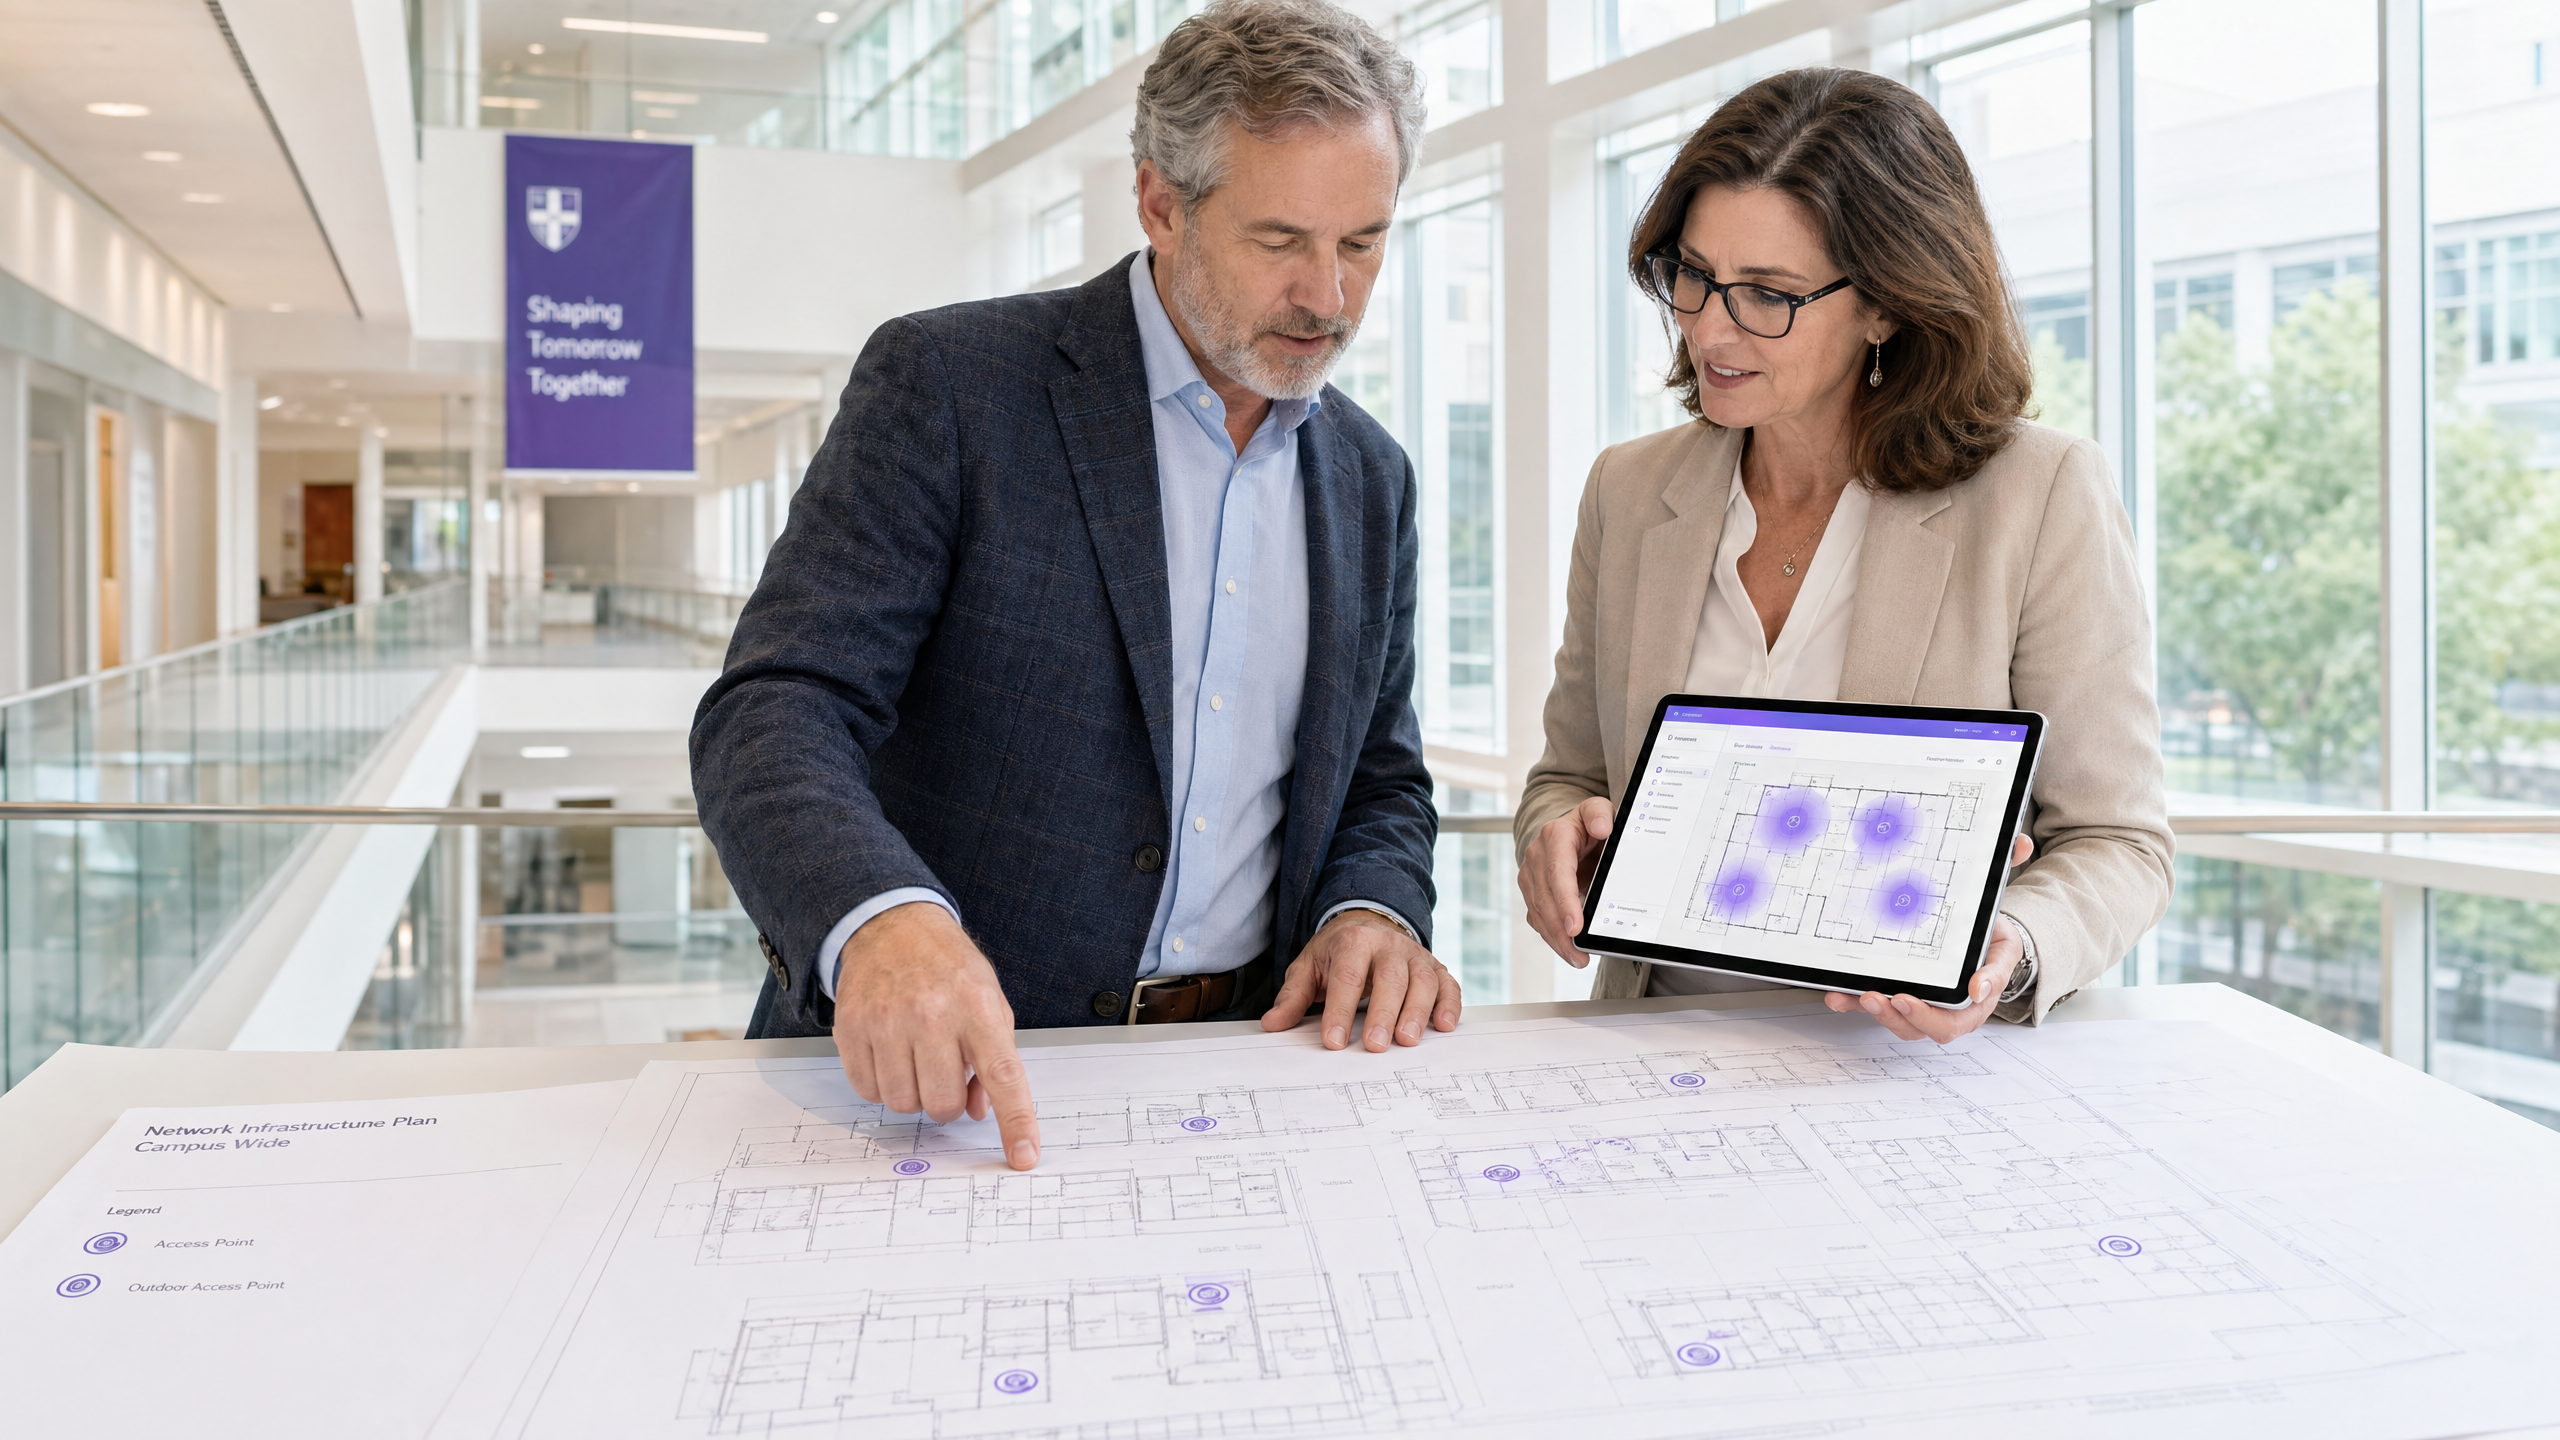
Un'indagine predittiva basata su planimetrie è insufficiente per ambienti campus complessi. È necessario condurre indagini RF attive e in loco. I materiali da costruzione nelle università più antiche — muratura spessa, rete metallica, cemento armato — attenuano i segnali in modo imprevedibile. L'indagine identifica i "buchi neri" RF e aiuta a determinare il posizionamento ottimale degli AP per garantire sia la copertura che la capacità. L'output dovrebbe essere una mappa di calore convalidata che mostri la potenza del segnale, l'utilizzo del canale e i livelli di interferenza su ogni piano.
Fase 2: Pianificazione della Capacità
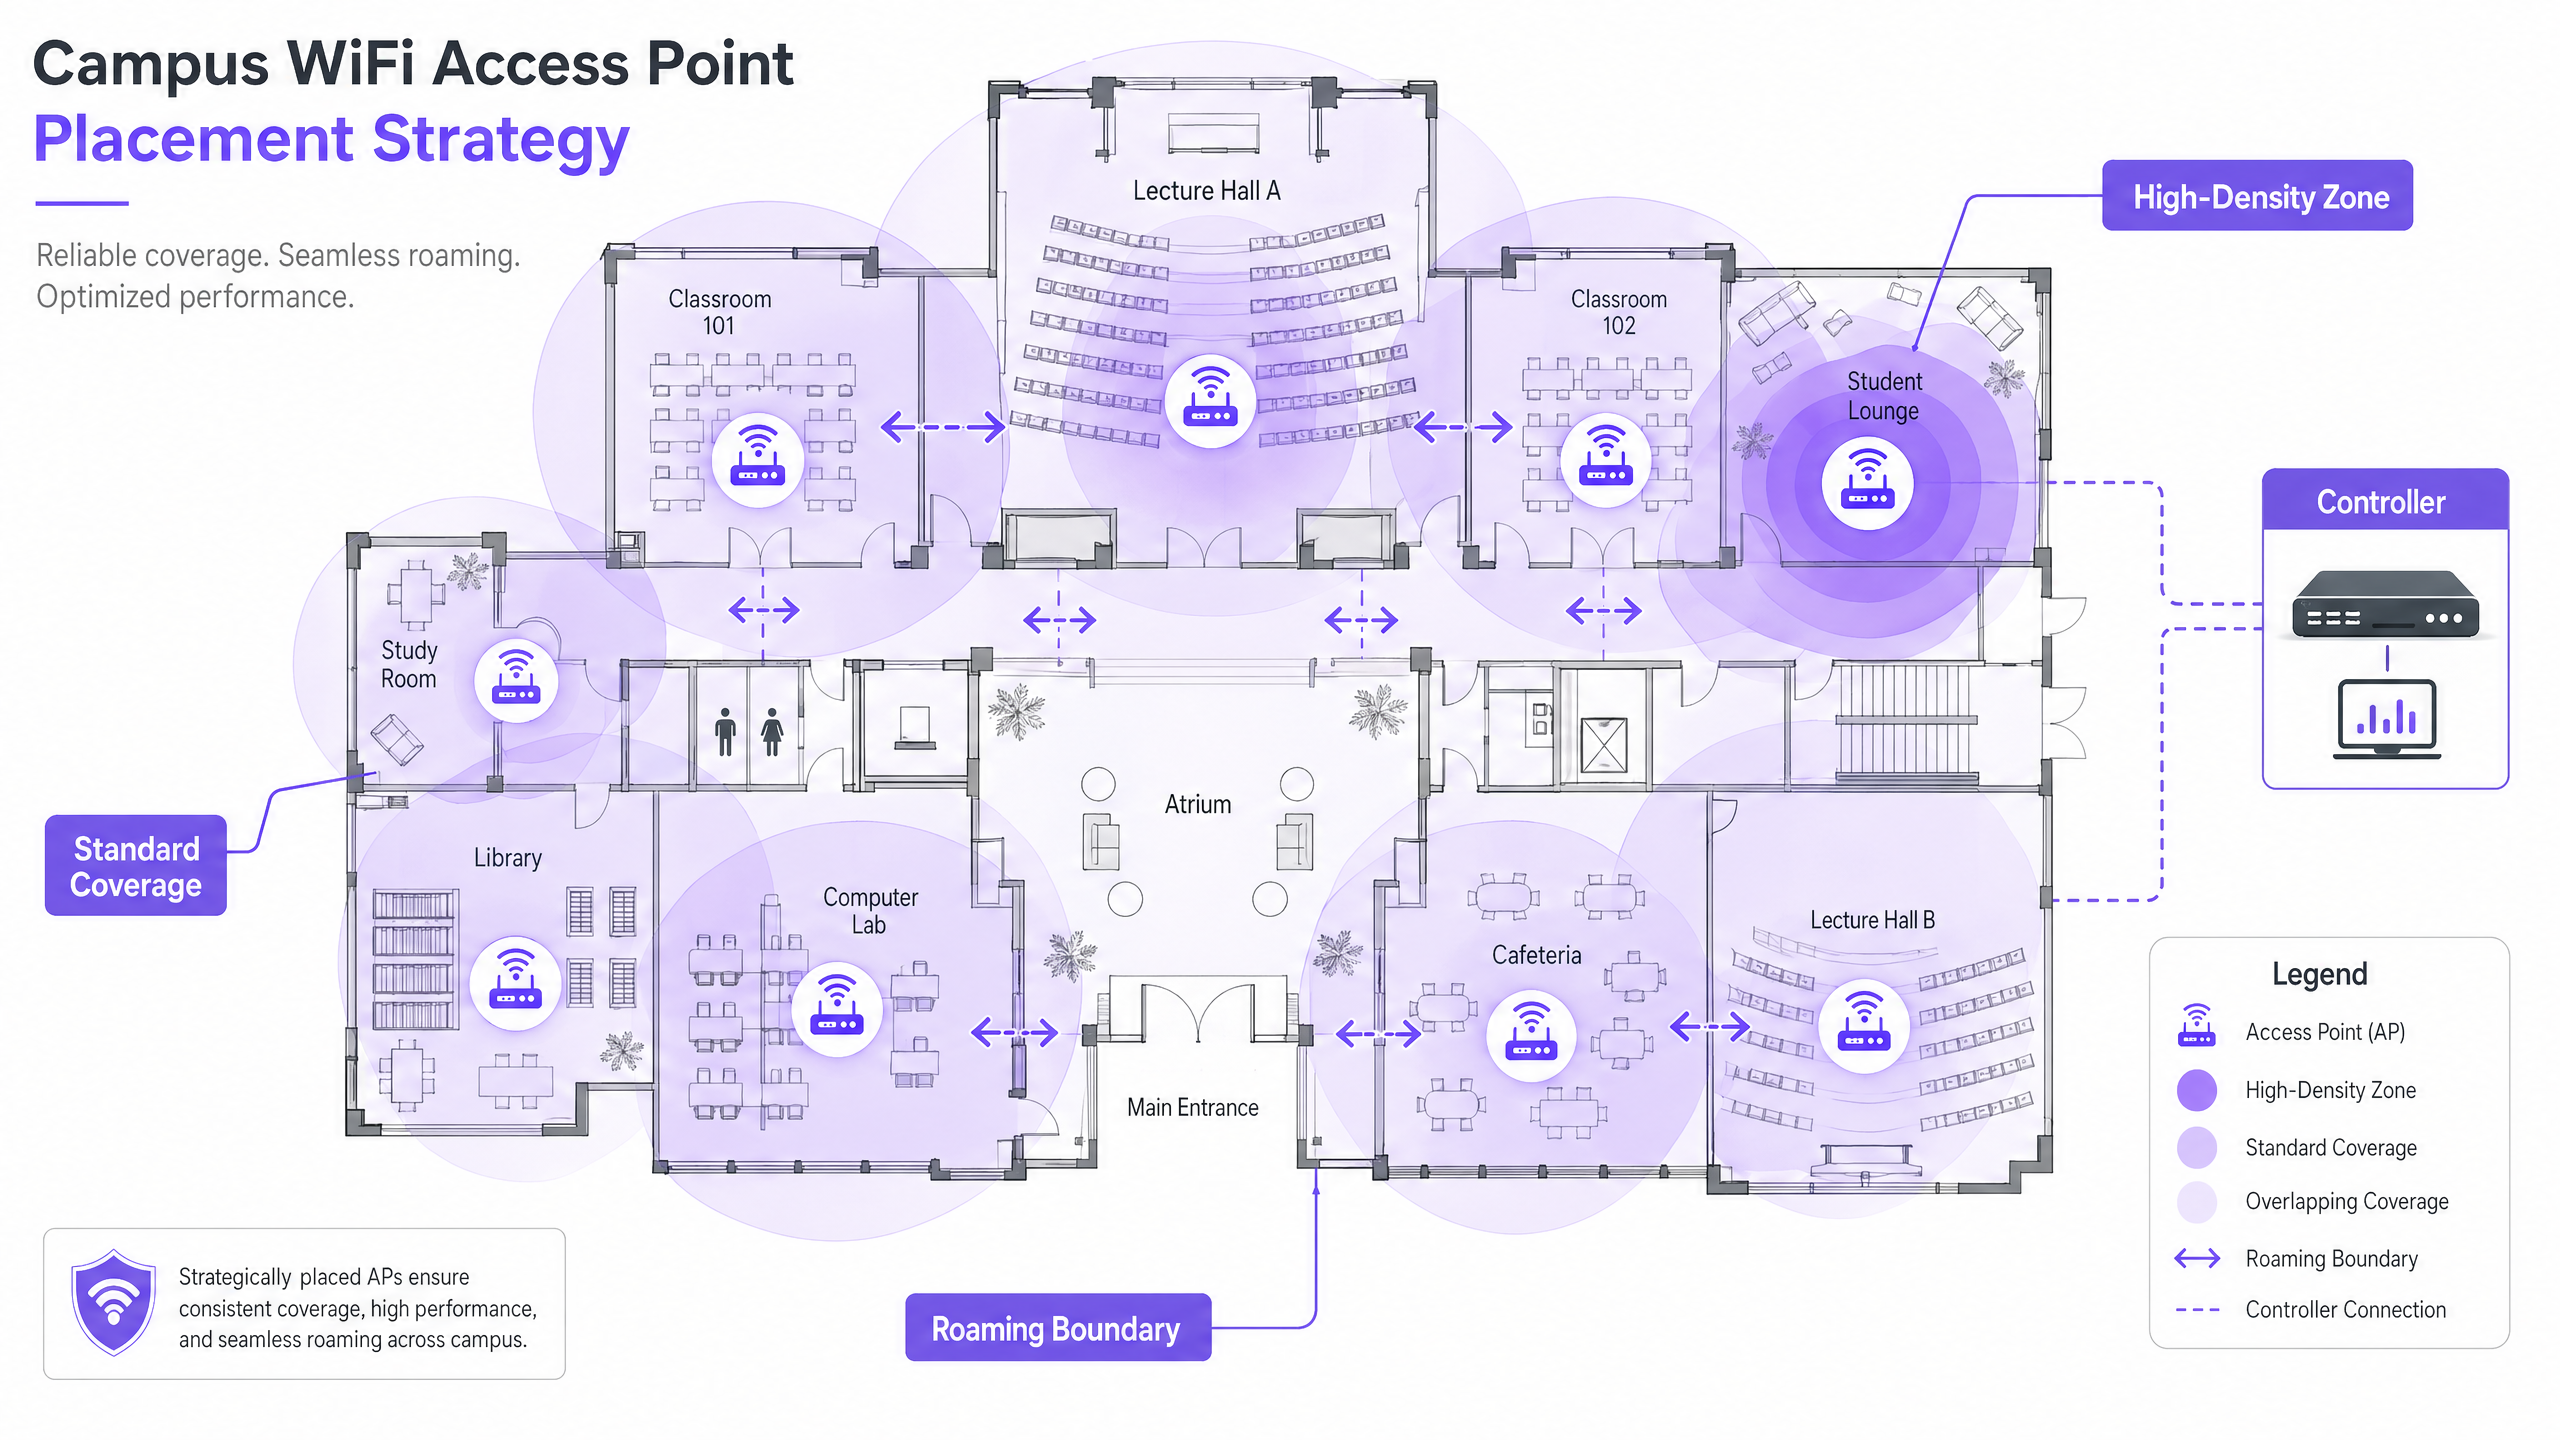
Storicamente, le reti erano progettate per la copertura — assicurando che un segnale raggiungesse ogni angolo. Oggi, si progetta per la capacità. In un'aula magna da 300 posti, si assumano tre dispositivi per studente: laptop, smartphone e tablet. Ciò richiede l'implementazione di AP ad alta densità con antenne direzionali per settorializzarela stanza, piuttosto che affidarsi a un singolo AP omnidirezionale che si sovraccaricherebbe rapidamente. La regola generale per le implementazioni ad alta densità è un AP ogni 25-30 utenti contemporanei in un ambiente di lezione.
Fase 3: Posizionamento degli AP e Pianificazione dei Canali
Un'attenta pianificazione dei canali è essenziale per minimizzare l'interferenza co-canale (CCI). Utilizzare canali non sovrapposti (1, 6, 11 su 2.4GHz; allocazione dinamica su 5GHz e 6GHz). Assicurarsi che gli AP siano posizionati strategicamente — evitare di montarli sopra controsoffitti o dietro condotti HVAC, che degradano le prestazioni. Per ambienti con soffitti alti, utilizzare AP con antenne direzionali rivolte verso il basso.
Fase 4: Configurazione del Roaming Senza Interruzioni
Quando gli utenti si spostano tra gli edifici, la loro connessione deve passare senza interruzioni tra gli AP. Implementare la triade del roaming veloce: 802.11k (segnalazioni dei vicini), 802.11v (gestione della transizione BSS) e 802.11r (transizione BSS veloce). Insieme, questi standard consentono ai dispositivi client di prendere decisioni intelligenti sul roaming e di completare i passaggi di autenticazione in millisecondi anziché secondi — fondamentale per VoIP e applicazioni in tempo reale.
La regolazione della potenza di trasmissione è altrettanto importante. Se la potenza Tx è troppo alta, i dispositivi client si aggrapperanno a un AP distante ('client appiccicosi') invece di passare a uno più vicino. Ridurre la potenza Tx per creare celle di copertura sovrapposte ma di dimensioni appropriate e disabilitare le velocità di trasmissione dati legacy (1, 2, 5.5 Mbps) per forzare i dispositivi a interrompere le connessioni deboli e a effettuare il roaming.
Fase 5: Segmentazione VLAN e Applicazione delle Policy
Creare VLAN dedicate per ogni classe di utenti: Personale, Studenti, Ospiti e dispositivi IoT. I dispositivi IoT — sistemi di gestione degli edifici, telecamere di sicurezza, segnaletica digitale — non dovrebbero mai condividere un segmento di rete con i dispositivi utente. Applicare regole firewall rigorose tra le VLAN, consentendo solo la comunicazione minima necessaria. Per la sicurezza a livello DNS e la protezione contro i domini dannosi, consultare la nostra guida su come Proteggere la Rete con DNS e Sicurezza Robusti .
Best Practice per Ambienti Campus
Le seguenti raccomandazioni neutrali rispetto al fornitore rappresentano le pratiche standard del settore per le implementazioni di grandi reti wireless.
Band Steering: Forzare i dispositivi client compatibili sulle bande meno congestionate da 5GHz o 6GHz, riservando la banda da 2.4GHz per i dispositivi legacy e i sensori IoT a lungo raggio. La maggior parte dei controller moderni supporta il band steering automatico.
Soglie RSSI Minime: Configurare il controller per rifiutare le connessioni da client la cui potenza del segnale scende al di sotto di una soglia definita (tipicamente -75 dBm). Ciò impedisce ai client con segnale debole di degradare l'esperienza per tutti gli altri utenti sull'AP.
Prevenzione delle Intrusioni Wireless (WIPS): Abilitare WIPS sul controller per rilevare e sopprimere gli AP non autorizzati — router personali collegati da studenti o personale che causano interferenze e introducono vulnerabilità di sicurezza.
Copertura Esterna: Estendere la rete a cortili e aree salotto esterne utilizzando AP robusti e resistenti alle intemperie con antenne direzionali. Gli AP esterni devono gestire temperature estreme, umidità e resistenza agli atti vandalici.
Gestione dei Lease DHCP: Nelle aree ad alto ricambio (mense, biblioteche), ridurre i tempi di lease DHCP per le reti ospiti a una o due ore per prevenire l'esaurimento degli indirizzi IP.
L'attenzione di Purple per l'istruzione superiore sta crescendo rapidamente — leggi del nostro VP Education Tim Peers che si unisce al team e cosa significa per la strategia di rete del campus.
Risoluzione dei Problemi e Mitigazione dei Rischi
Anche le reti ben progettate incontrano problemi operativi. Di seguito sono riportate le modalità di guasto più comuni e le relative mitigazioni.
| Modalità di Guasto | Sintomi | Causa Radice | Mitigazione |
|---|---|---|---|
| Client Appiccicosi | Prestazioni scarse nonostante segnale forte | Potenza Tx troppo alta; velocità legacy abilitate | Ridurre la potenza Tx; disabilitare le velocità inferiori a 11 Mbps |
| Esaurimento DHCP | Utenti impossibilitati a connettersi | Tempi di lease troppo lunghi; sottorete troppo piccola | Ridurre i tempi di lease; espandere le sottoreti |
| Interferenza Co-Canale | Throughput lento in tutto il piano | Scarsa pianificazione dei canali | Implementare l'assegnazione dinamica dei canali |
| AP Non Autorizzati | Interferenza; avvisi di sicurezza | Router personali non autorizzati | Abilitare WIPS; condurre audit RF regolari |
| Errori di Autenticazione | Utenti impossibilitati ad accedere | Sovraccarico o errata configurazione del server RADIUS | Distribuire RADIUS ridondanti; monitorare i log di autenticazione |
ROI e Impatto sul Business
Per la dirigenza universitaria e i direttori delle operazioni delle sedi, il ROI di una rete ad alte prestazioni si estende ben oltre la connettività di base. Una robusta rete wireless del campus supporta direttamente strumenti pedagogici moderni, iniziative digitali del campus e programmi di efficienza operativa.
Sfruttare WiFi Analytics fornisce informazioni utili su affluenza, tempi di permanenza e utilizzo dello spazio. Questi dati possono informare le decisioni immobiliari — identificando edifici sottoutilizzati o spazi con picchi di domanda — e ottimizzare l'uso dell'HVAC basandosi su dati di occupazione reali, offrendo risparmi energetici misurabili. Queste sono le stesse strategie di analisi implementate dagli operatori negli ambienti Retail e Hospitality , ora sempre più applicate agli ambienti campus.
Per le organizzazioni che implementano il guest WiFi come parte di una più ampia strategia di coinvolgimento digitale, una piattaforma Guest WiFi ben configurata può anche supportare l'automazione del marketing, il coinvolgimento degli ex-alunni e i programmi di esperienza dei visitatori. Per le sedi campus più piccole o satellitari, la nostra guida su Come Configurare un Hotspot WiFi per la Tua Attività fornisce un punto di partenza pratico.
Ascolta il Briefing
Key Definitions
802.11ax (WiFi 6)
The current IEEE standard for wireless networking, designed specifically to improve efficiency and performance in high-density environments through OFDMA, MU-MIMO, and TWT.
Essential for modern campus deployments to support a high volume of concurrent devices without performance degradation.
Co-Channel Interference (CCI)
Interference that occurs when multiple access points in the same area operate on the same channel, causing devices to wait for clear airtime before transmitting.
Poor channel planning leads to high CCI, which severely degrades network throughput even when signal strength is strong.
VLAN (Virtual Local Area Network)
A logical subnetwork that groups a collection of devices, isolating their traffic from other devices on the same physical network infrastructure.
Crucial for security and performance; separating guest, staff, student, and IoT traffic prevents lateral movement and reduces congestion.
802.1X
An IEEE standard for port-based Network Access Control, providing a credential-based authentication mechanism for devices connecting to a LAN or WLAN via a RADIUS server.
The mandatory standard for secure, enterprise-grade authentication for staff and enrolled students on campus networks.
Captive Portal
A web page that a user of a public-access network must interact with before network access is granted, typically used for terms of service acceptance, authentication, and data capture.
Used for guest onboarding on campus networks; must be GDPR-compliant and integrated with an analytics platform for operational value.
OFDMA (Orthogonal Frequency-Division Multiple Access)
A multi-user version of OFDM that allows a single access point to simultaneously serve multiple clients on different sub-channels within the same transmission.
A key WiFi 6 feature that dramatically improves efficiency in high-density environments like lecture halls.
Sticky Client
A wireless device that remains connected to a distant AP with a weak signal, even when a closer AP with a stronger signal is available, due to the client's reluctance to initiate a roam.
Causes poor performance for the affected user and unnecessary load on the distant AP; mitigated by proper RF tuning and disabling legacy data rates.
RSSI (Received Signal Strength Indicator)
A measurement of the power level of a received radio signal, typically expressed in dBm (decibels relative to one milliwatt), where values closer to zero indicate a stronger signal.
Used during site surveys to determine coverage boundaries and during controller configuration to set minimum connection thresholds.
PoE+ (Power over Ethernet Plus)
An IEEE 802.3at standard that delivers up to 30 watts of power over standard Ethernet cabling, sufficient to power WiFi 6 access points without a separate power supply.
The minimum PoE standard required for new campus deployments using WiFi 6 APs.
Worked Examples
A Russell Group university is upgrading a Grade II listed, 19th-century library to support 500 concurrent student connections. The building features thick stone walls, high ceilings, and ornate internal partitions. How should the IT team approach the wireless deployment?
Step 1: Commission an active, on-site RF survey — predictive modelling will be highly inaccurate due to the stone walls and irregular floor plan. Use professional wifi survey software to generate validated heat maps. Step 2: Deploy high-density WiFi 6 APs with directional patch antennas focused downward into reading areas, avoiding signal bounce off high ceilings. Target one AP per 25 concurrent users. Step 3: Implement a dedicated VLAN for student access via 802.1X linked to the university's Active Directory, and a separate guest VLAN with a captive portal for visiting researchers and public users. Step 4: Tune AP transmit power to create appropriately sized coverage cells, preventing sticky clients as students move between reading rooms. Step 5: Disable legacy data rates (1, 2, 5.5 Mbps) to enforce roaming. Step 6: Deploy a cloud-managed controller for centralised visibility and RF optimisation.
A Premier League football stadium needs to provide WiFi coverage for 40,000 concurrent connections on match days, with a secondary requirement for event-day analytics on fan movement and dwell times.
Step 1: Deploy under-seat APs with highly directional antennas to create micro-cells for specific seating sections — this is the only viable approach at this density. Step 2: Disable 2.4GHz radios on the majority of APs to eliminate Co-Channel Interference in the dense RF environment; force all traffic to 5GHz and 6GHz. Step 3: Enable 802.11k/v/r to facilitate rapid roaming as fans move through concourses during half-time. Step 4: Implement a captive portal via Purple's Guest WiFi platform for secure, high-throughput onboarding, capturing opt-in analytics data on fan movement and dwell times. Step 5: Segment the network with separate VLANs for fans, operations staff, broadcast equipment, and point-of-sale systems. Step 6: Ensure PCI DSS compliance on the payment network segment.
Practice Questions
Q1. You are deploying APs in a new university dormitory block. The building has long central corridors with student rooms on either side, separated by solid concrete walls. Should you place APs in the central corridors or inside the individual dorm rooms?
Hint: Consider the attenuation caused by concrete walls and fire doors, and the capacity required per room.
View model answer
Deploy APs inside the dorm rooms, using wall-plate APs that mount flush to the wall and connect via the in-room Ethernet port. Corridor deployments result in poor signal penetration into rooms due to concrete walls and heavy fire doors, and fail to provide the per-room capacity needed for multiple devices per student. Wall-plate APs provide a dedicated, high-quality connection for each room and are the industry-standard approach for student accommodation.
Q2. Users in the university cafeteria are reporting slow WiFi speeds during the lunch period, despite their devices showing full signal strength bars. What are the two most likely causes, and how would you investigate each?
Hint: Signal strength does not equal capacity. Consider both the RF environment and the number of concurrent users.
View model answer
The two most likely causes are: (1) AP capacity overload — the APs are overwhelmed by the sheer number of concurrent devices during the lunch rush. Investigate by checking the controller dashboard for client counts per AP and throughput utilisation. If APs are serving 80+ clients, additional APs or a high-density AP upgrade is required. (2) Co-Channel Interference — multiple APs in the cafeteria are operating on the same channel, causing devices to wait for clear airtime. Investigate using a spectrum analyser or the controller's RF health dashboard. Resolve by enabling dynamic channel assignment and ensuring non-overlapping channel allocation.
Q3. Your university is hosting a major international conference with 800 delegates, all of whom will need WiFi access for three days. The conference is held in a building that normally serves 200 staff. How do you approach the temporary network uplift?
Hint: Consider both the temporary capacity increase and the security separation between conference delegates and permanent staff.
View model answer
Deploy temporary high-density APs in the main conference hall and breakout rooms, connected to the existing switching infrastructure via temporary PoE+ switches if port capacity is insufficient. Create a dedicated conference VLAN, completely isolated from the staff network, with its own DHCP scope and internet breakout. Deploy a branded captive portal via a guest WiFi platform for delegate onboarding, capturing opt-in data for post-event analytics. Reduce DHCP lease times to two hours to manage IP address churn across the three-day event. After the conference, remove temporary APs and decommission the conference VLAN.