
Le 10 principali cause di timeout DHCP sulle reti wireless ad alta densità
Questa guida di riferimento tecnica e autorevole identifica le dieci principali cause di timeout DHCP sulle reti wireless ad alta densità e fornisce strategie di risoluzione pratiche e indipendenti dai fornitori. Progettata per leader IT senior, architetti di rete e direttori operativi delle strutture, copre principi ingegneristici approfonditi, flussi di lavoro di implementazione passo-passo e risultati aziendali misurabili. Scopri come eliminare i colli di bottiglia della connessione e ottimizzare la tua infrastruttura wireless per offrire una connettività fluida in ambienti aziendali esigenti.
Ascolta questa guida
Visualizza trascrizione del podcast
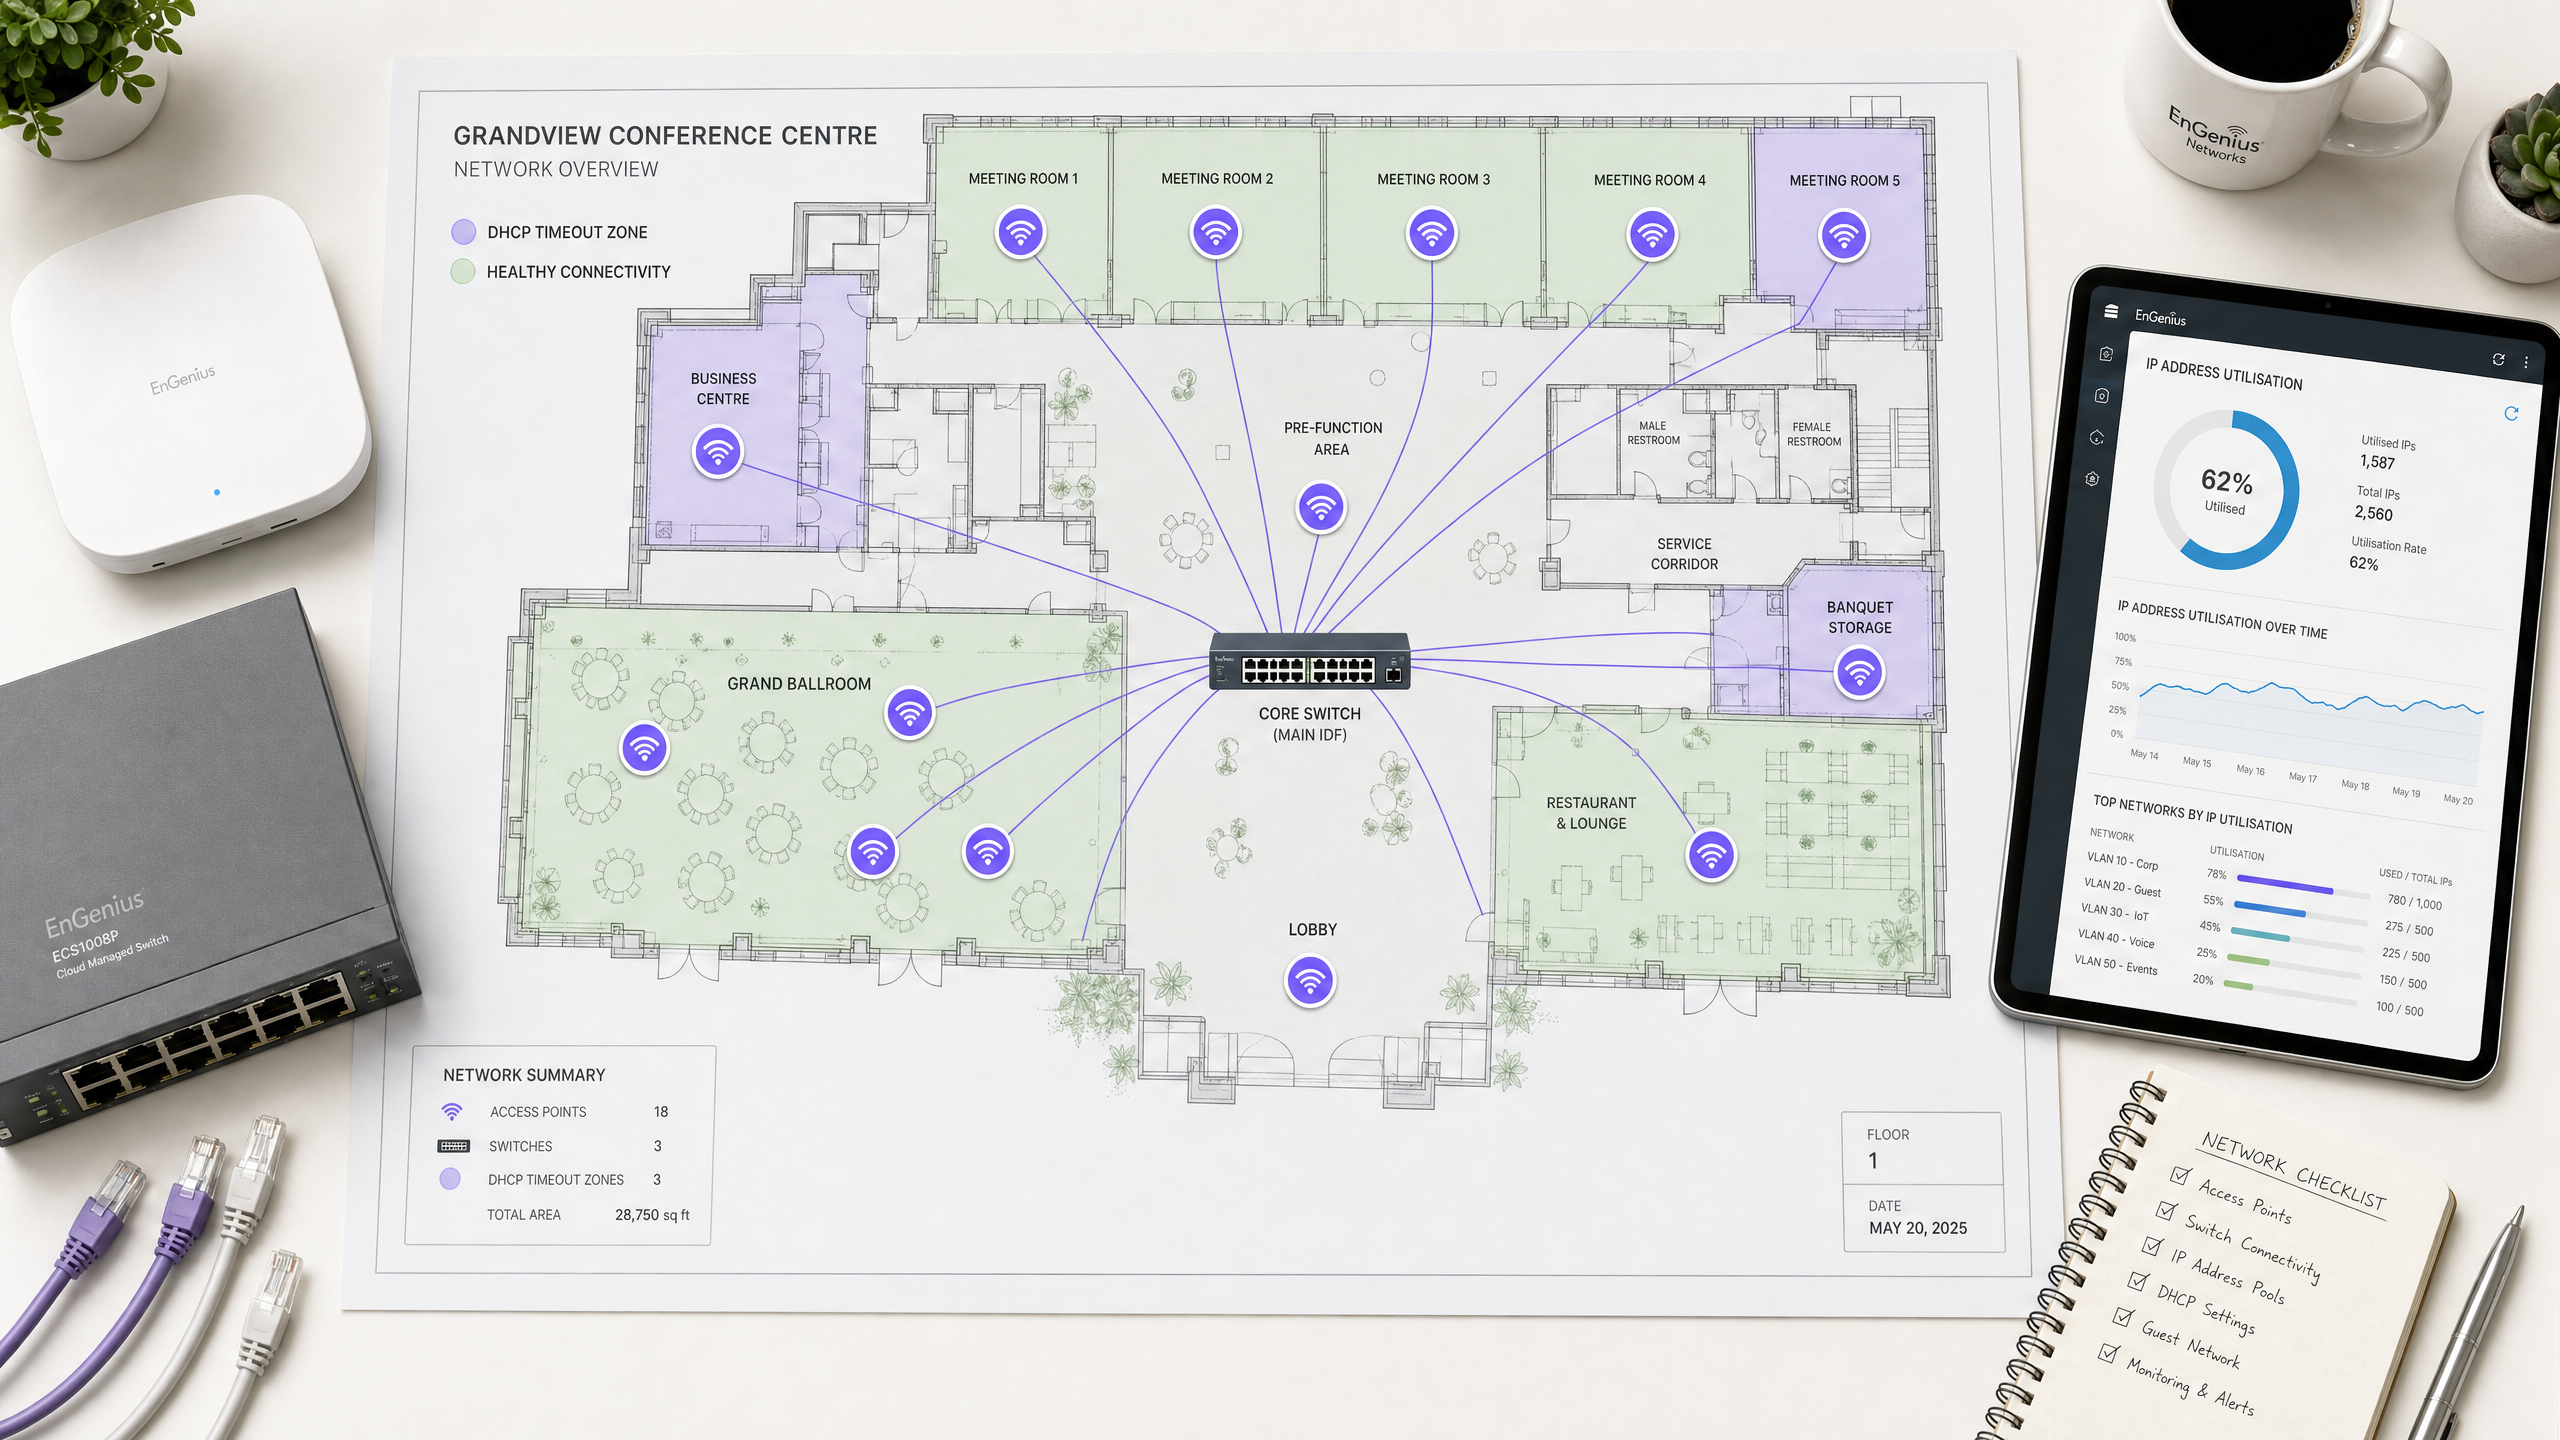
Sintesi esecutiva
Nei moderni ambienti aziendali — come hotel ad alta capacità, centri commerciali, hub di trasporto e stadi — la connettività wireless è un fattore di business fondamentale. Tuttavia, l'esperienza degli ospiti spesso si interrompe proprio al primo passaggio dell'onboarding di rete: l'ottenimento di un indirizzo IP. Sulle reti wireless ad alta densità, i timeout DHCP (Dynamic Host Configuration Protocol) sono una delle cause principali più comuni ma meno diagnosticate di fallimento dell'onboarding. Quando centinaia o migliaia di dispositivi tentano di connettersi simultaneamente, le configurazioni DHCP tradizionali falliscono sotto il carico, lasciando gli utenti bloccati con una rotella di caricamento che gira o con un indirizzo link-local 169.254.x.x autoassegnato.
Questa guida di riferimento tecnica e autorevole esplora le dieci principali cause di timeout DHCP sulle reti wireless ad alta densità. Supera la teoria accademica per fornire ad architetti di rete senior, CTO e direttori operativi delle strutture strategie di risoluzione immediate e pratiche. Ottimizzando sistematicamente le dimensioni degli scope DHCP, riducendo i tempi di lease, implementando solide configurazioni Layer 2/3 e distribuendo architetture server ad alta disponibilità, le organizzazioni possono ridurre significativamente la latenza di connessione, eliminare gli ostacoli all'onboarding e proteggere la reputazione del proprio marchio. L'implementazione di queste best practice si correla direttamente con una migliore soddisfazione degli ospiti, un maggiore coinvolgimento con prodotti chiave come il Guest WiFi e una raccolta dati più ricca attraverso WiFi Analytics .
Approfondimento tecnico
Per diagnosticare e risolvere i timeout DHCP, gli ingegneri di rete devono innanzitutto comprendere i meccanismi precisi dell'handshake DHCP a quattro vie, comunemente noto come processo DORA (Discover, Offer, Request, Acknowledge) [1]. Negli ambienti ad alta densità, questo processo è estremamente sensibile alla perdita di pacchetti, alla latenza e all'esaurimento delle risorse.
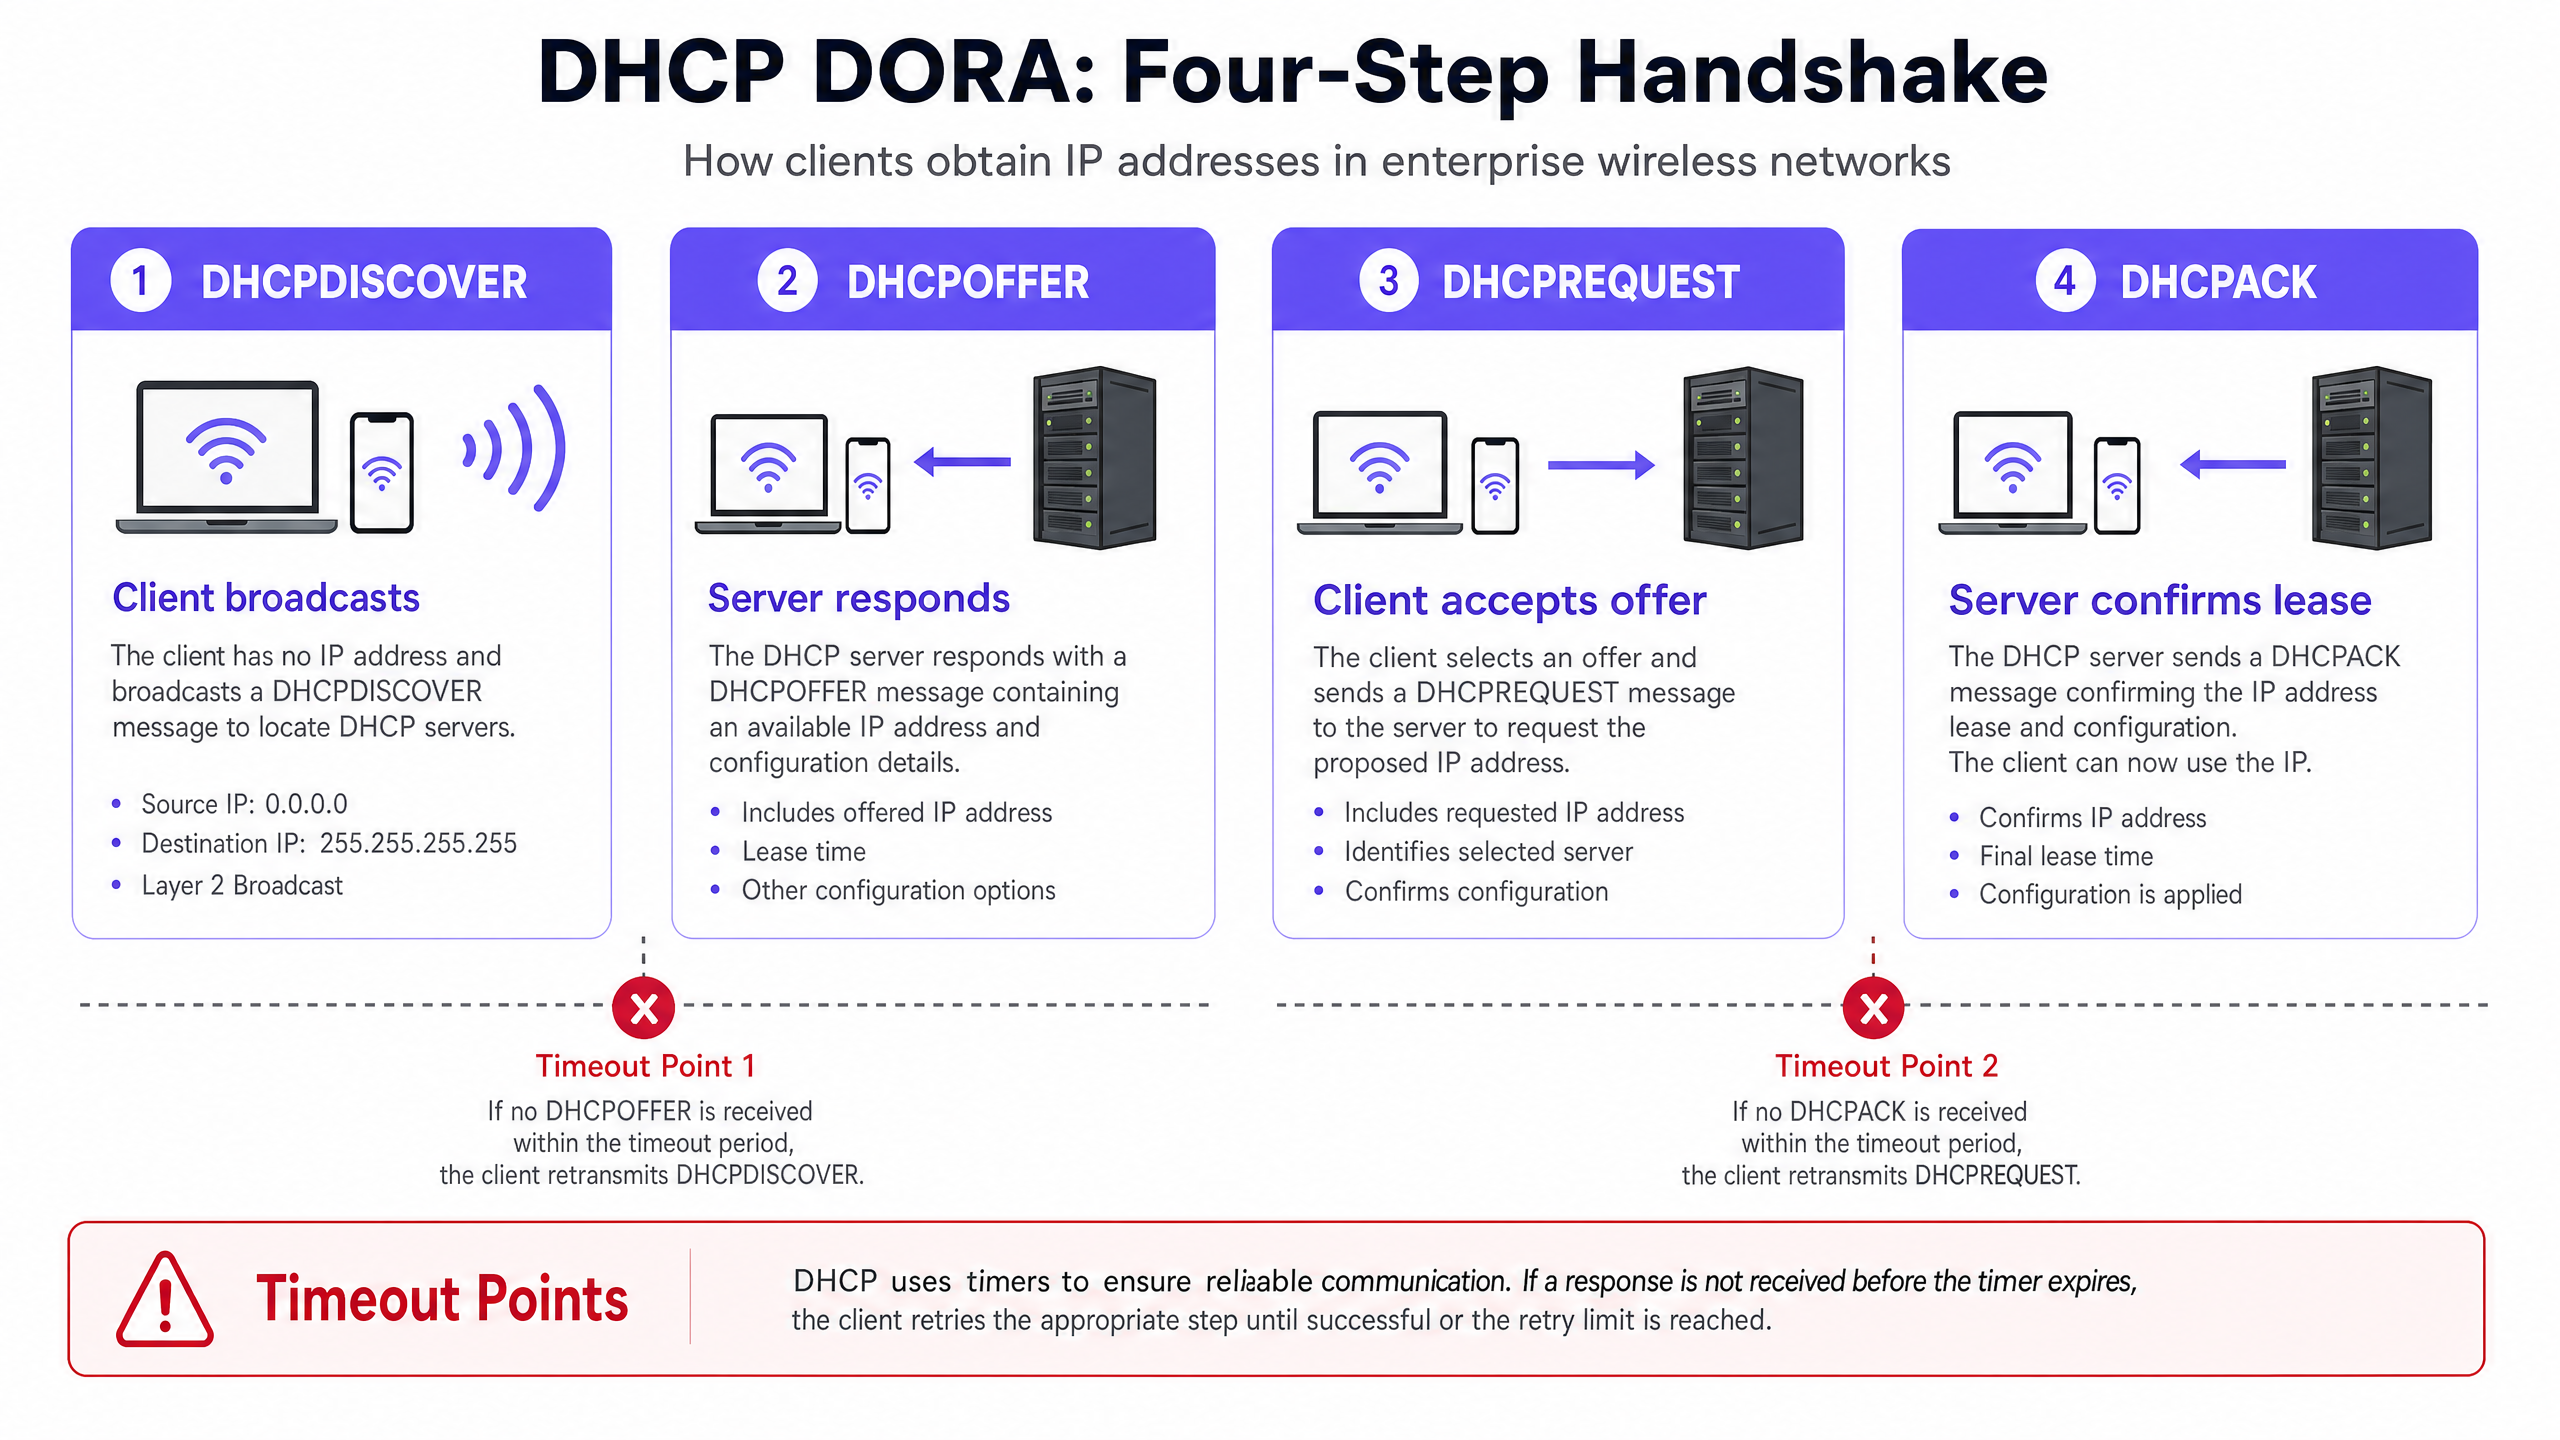
L'handshake DHCP (DORA) nel wireless ad alta densità
- DHCPDISCOVER (Broadcast): il client wireless si associa all'Access Point (AP) e trasmette in broadcast un pacchetto per individuare i server DHCP disponibili. In un dominio di broadcast di grandi dimensioni, questo pacchetto viene inondato su tutte le porte, consumando prezioso tempo di trasmissione wireless (airtime).
- DHCPOFFER (Unicast/Broadcast): ogni server DHCP attivo che riceve il messaggio di discovery riserva un indirizzo IP e invia un'offerta al client, specificando i parametri di lease, la subnet mask, il gateway predefinito e i server DNS.
- DHCPREQUEST (Broadcast): il client seleziona un'offerta (in genere la prima ricevuta) e trasmette in broadcast una richiesta per accettare quello specifico indirizzo IP, rifiutando implicitamente tutte le altre offerte.
- DHCPACK (Unicast/Broadcast): il server DHCP selezionato registra il lease nel proprio database e invia una conferma (acknowledgement) al client, confermando l'assegnazione dell'IP e la durata del lease. Il client applica quindi questa configurazione.
L'impatto dell'overhead wireless e della congestione dell'airtime
A differenza delle reti cablate in cui i broadcast Layer 2 sono gestiti via hardware a velocità gigabit, le reti wireless trasmettono i frame broadcast e multicast alla tariffa dati obbligatoria più bassa (spesso 1 Mbps, 6 Mbps o 11 Mbps a seconda della configurazione dell'SSID) per garantire che tutti i client distanti possano riceverli [2]. Su un SSID ad alta densità con migliaia di dispositivi attivi, i pacchetti DHCP broadcast consumano una quantità sproporziata di tempo di trasmissione RF (airtime), causando collisioni di pacchetti, ritrasmissioni e infine timeout. Un dispositivo client in genere si aspetta una risposta DHCP entro 2-4 secondi; se la congestione dell'airtime ritarda un qualsiasi passaggio del processo DORA oltre questa finestra temporale, il client va in timeout, interrompe l'associazione e riprova, creando un carico a cascata sulla rete.
Le 10 principali cause di timeout DHCP
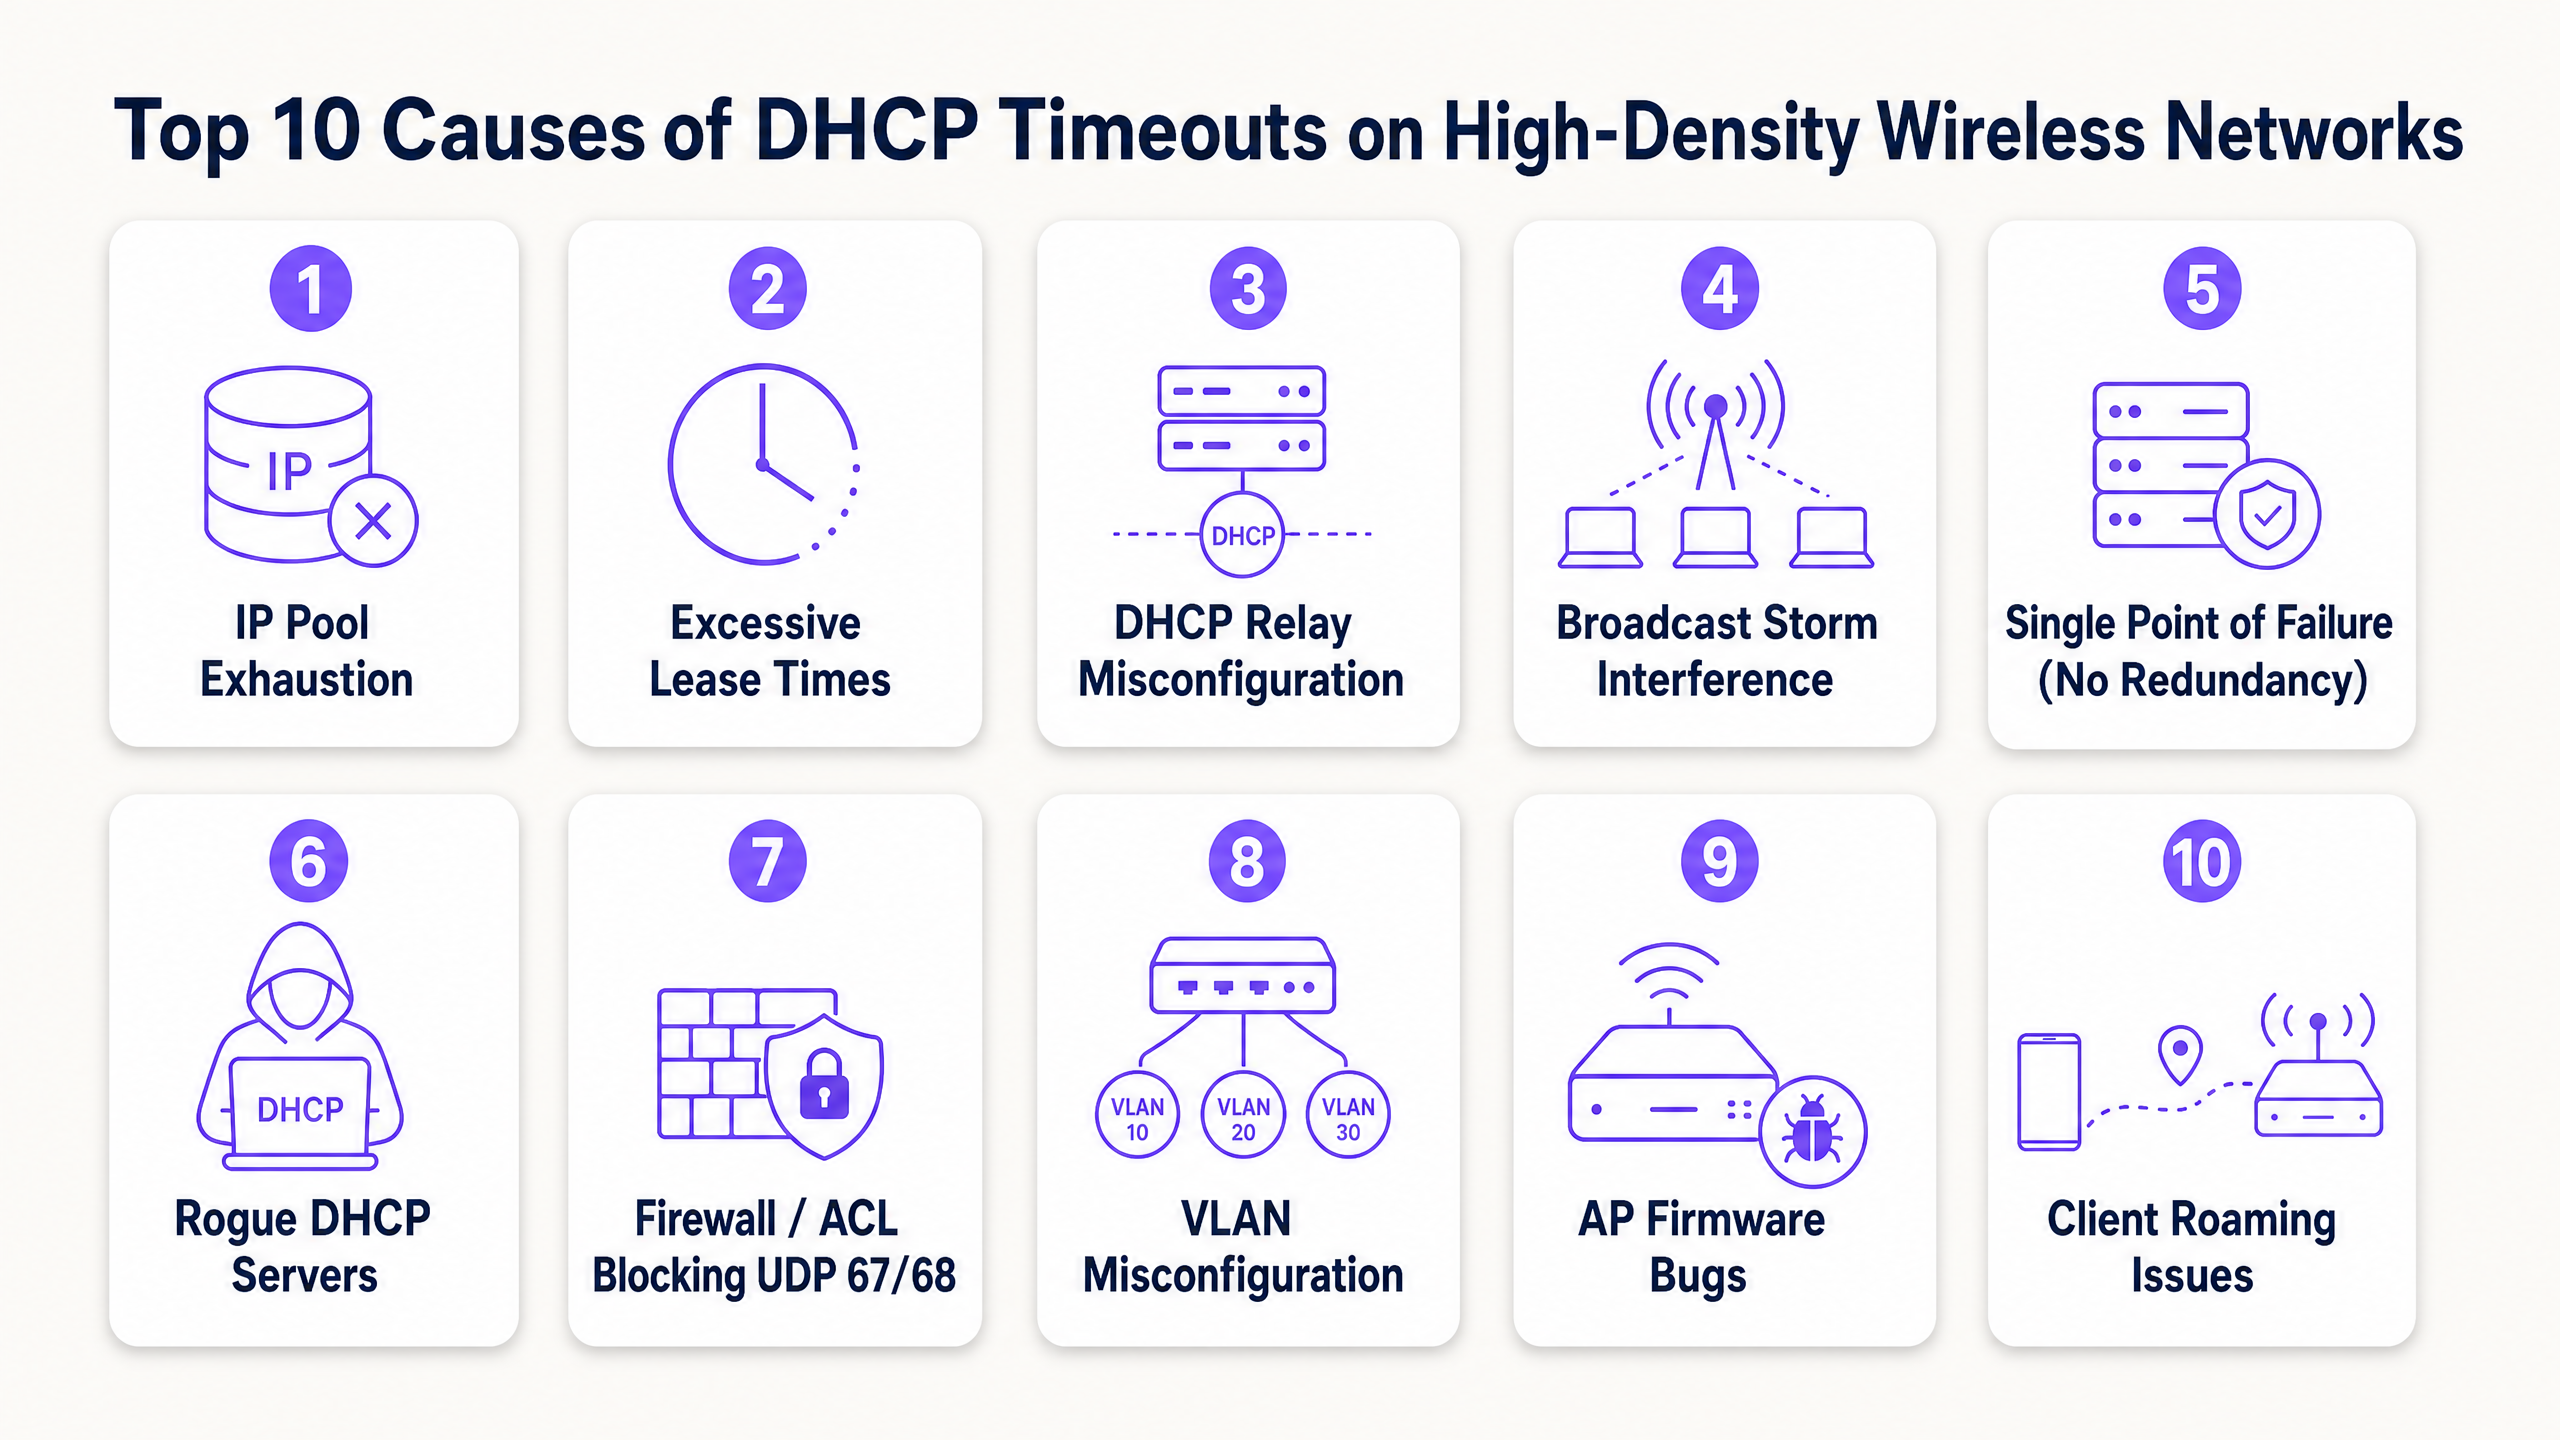
1. Esaurimento del pool di indirizzi IP DHCP
Il meccanismo: lo scope del server DHCP è troppo ridotto per il volume di dispositivi temporanei. Quando il pool è utilizzato al 100%, il server ignora silenziosamente i nuovi pacchetti DHCPDISCOVER perché non ha indirizzi da offrire.
Il contesto ad alta densità: una subnet standard di Classe C (/24) fornisce solo 254 indirizzi IP utilizzabili. Nella hall di un hotel, ai varchi di uno stadio o in una sala conferenze plenaria, il numero di dispositivi simultanei può facilmente superare questo limite in pochi minuti. A peggiorare la situazione, molti utenti portano con sé più dispositivi connessi (telefoni, smartwatch, tablet, laptop), moltiplicando la richiesta di IP.
Risoluzione: adegua le dimensioni degli scope di rete utilizzando la notazione CIDR (Classless Inter-Domain Routing). Passa le VLAN dei client ad alta densità a subnet /22 (1.022 IP) o /21 (2.046 IP). Assicurati che i tuoi strumenti di monitoraggio siano configurati per inviare avvisi all'80% di utilizzo del pool per consentire un'espansione proattiva dello scope prima degli eventi di picco.
2. Tempi di lease eccessivi sulle reti Guest
Il meccanismo: il tempo di lease determina per quanto tempo un client conserva un indirizzo IP prima di doverlo rinnovare o rilasciare. Se il tempo di lease è troppo lungo, il server DHCP mantiene l'indirizzo nel proprio database, impedendone la riassegnazione a un nuovo client anche se il dispositivo originale ha lasciato la struttura.
Il contesto ad alta densità: molte configurazioni DHCP predefinite specificano un tempo di lease di 24 ore o 8 giorni. In ambienti ad alta rotazione nel settore pubblico o dell'ospitalità — come un terminal di trasporto o un centro commerciale — gli ospiti in genere rimangono per meno di due ore [3]. Con un lease di 24 ore, un ospite che si connette per 10 minuti consuma un indirizzo IP per un'intera giornata, portando a un esaurimento artificiale del pool.
Risoluzione: allinea i tempi di lease con i tempi di permanenza dei client. Implementa un tempo di lease da 30 a 60 minuti per le reti guest. Per le reti del personale aziendale in cui i dispositivi rimangono connessi per un intero turno, utilizza un tempo di lease da 8 a 12 ore. Ciò garantisce un rapido recupero degli indirizzi IP dai client disconnessi.
3. Errata configurazione del DHCP Relay Agent
Il meccanismo: Poiché i messaggi di DHCP discovery sono broadcast di Layer 2, non possono superare i confini del router (Layer 3). Un DHCP Relay Agent (tipicamente configurato su uno switch Layer 3 o su un gateway di sicurezza utilizzando comandi come ip helper-address di Cisco) deve intercettare questi broadcast e inoltrarli come pacchetti unicast al server DHCP centrale [4]. Se il relay agent è configurato in modo errato, ha l'IP helper sbagliato o viene omesso da una VLAN appena creata, il traffico DHCP verrà bloccato.
Il contesto ad alta densità: Le reti ad alta densità si affidano fortemente alla segmentazione VLAN per limitare i domini di broadcast. Quando si distribuisce un nuovo SSID o si amplia una sede, i tecnici spesso creano nuove VLAN client. Se la configurazione del relay agent non viene aggiornata sulle corrispondenti interfacce Layer 3, i client su quelle VLAN subiranno timeout DHCP immediati.
Risoluzione: Definisci modelli di configurazione rigorosi per tutti gli switch Layer 3. Assicurati che ogni interfaccia VLAN client disponga di una coppia ridondante di indirizzi DHCP helper che puntano ai server DHCP primario e secondario. Verifica il routing end-to-end tra l'IP dell'interfaccia di relay (che il server DHCP utilizza per determinare quale ambito di sottorete assegnare) e il server DHCP stesso.
4. Tempeste di Broadcast e Multicast
Il meccanismo: Un traffico broadcast o multicast eccessivo su una VLAN satura il mezzo wireless. Poiché il wireless è un mezzo half-duplex condiviso, gli AP e i client devono attendere che le frequenze siano libere prima di trasmettere. Una tempesta di broadcast, spesso causata da loop di commutazione, schede di interfaccia di rete guaste o protocolli peer-to-peer aggressivi, satura il tempo di trasmissione (airtime), causando l'accodamento, il ritardo o la perdita dei pacchetti DHCP.
Il contesto ad alta densità: Nelle reti wireless piatte e di grandi dimensioni prive di un adeguato isolamento Layer 2, il traffico broadcast peer-to-peer (come Apple AirPlay, Google Chromecast o l'individuazione della rete di Windows) viene replicato da ogni AP sulla VLAN. In una sede con 10.000 utenti, questo "chattering" di sottofondo può consumare oltre il 50% della larghezza di banda wireless disponibile, lasciando un tempo di trasmissione insufficiente per i pacchetti critici di handshake DHCP.
Risoluzione: Abilita il Client Isolation (noto anche come blocco peer-to-peer) sul controller wireless per impedire ai client di comunicare direttamente tra loro. Configura la Broadcast and Multicast Suppression sugli AP e sugli switch, limitando il traffico broadcast a una piccola percentuale della capacità del collegamento (ad es. 100 pacchetti al secondo). Laddove supportato, abilita il DHCP Proxy sugli AP per convertire le offerte e i riconoscimenti DHCP broadcast in frame unicast diretti specificamente al client richiedente.
5. Single Point of Failure (Mancanza di ridondanza DHCP)
Il meccanismo: Un server DHCP singolo e non ridondante rappresenta una vulnerabilità critica. Se il server si arresta in modo anomalo, subisce aggiornamenti di sistema o perde la connettività di rete, la capacità di onboarding dell'intera rete si interrompe immediatamente. I lease esistenti rimangono attivi, ma nessun nuovo client può ottenere un indirizzo IP e i client in roaming non possono rinnovare i propri lease.
Il contesto ad alta densità: Le sedi ad alta densità operano nel rispetto di rigidi SLA operativi. Uno stadio durante una partita o un centro congressi durante un discorso di apertura non possono tollerare nemmeno cinque minuti di inattività del DHCP. Affidarsi a un singolo router o a una singola macchina virtuale per gestire migliaia di richieste di lease rapide è un'architettura ad alto rischio.
Risoluzione: Distribuisci il DHCP in una configurazione ad alta disponibilità. Utilizza il Windows Server DHCP Failover in modalità Load Balance (suddivisione 50/50) o in modalità Hot Standby, oppure implementa appliance DHCP ridondanti di livello enterprise (come Infoblox o BlueCat) [5]. Assicurati che i server DHCP siano distribuiti fisicamente o logicamente su diversi hypervisor e percorsi di rete per eliminare i guasti di modo comune.
6. Server DHCP non autorizzati (Rogue DHCP)
Il meccanismo: Un server DHCP non autorizzato è un dispositivo abilitato al DHCP non autorizzato connesso alla rete. Intercetta i broadcast DHCPDISCOVER dei client e risponde con i propri pacchetti DHCPOFFER, spesso distribuendo configurazioni IP errate, gateway predefiniti errati o server DNS dannosi.
Il contesto ad alta densità: Nelle grandi sedi, nei punti vendita o negli uffici del settore pubblico, le porte ethernet fisiche sono spesso accessibili nelle aree pubbliche, oppure gli utenti possono portare dispositivi non autorizzati (come router da viaggio di livello consumer o macchine virtuali con rete a ponte) e collegarli alla presa a muro. Ciò comporta conflitti di indirizzi IP, black hole di routing e gravi rischi per la sicurezza, inclusi gli attacchi man-in-the-middle.
Risoluzione: Abilita il DHCP Snooping su tutti gli switch di accesso e distribuzione [6]. Il DHCP snooping designa le porte dello switch come "attendibili" (connesse a server DHCP o relay agent legittimi) o "non attendibili" (connesse ai client). Lo switch scarterà automaticamente qualsiasi risposta del server DHCP (come DHCPOFFER o DHCPACK) proveniente da una porta non attendibile, neutralizzando istantaneamente i server non autorizzati.
7. Firewall, ACL e criteri di sicurezza che bloccano le porte UDP 67/68
Il meccanismo: Il DHCP si affida alla porta UDP 67 (ascolto lato server e destinazione lato client) e alla porta UDP 68 (ascolto lato client e destinazione lato server). Se i firewall di rete, le liste di controllo degli accessi (ACL) degli switch o i criteri di sicurezza degli endpoint bloccano queste porte, l'handshake DORA non può essere completato.
Il contesto ad alta densità: Il rafforzamento della sicurezza è una priorità per le reti aziendali. Tuttavia, criteri di sicurezza eccessivamente aggressivi spesso bloccano inavvertitamente il traffico DHCP. Ad esempio, durante la migrazione di un firewall o l'aggiornamento di un criterio, un amministratore potrebbe bloccare tutto il traffico UDP su un segmento senza rendersi conto di aver interrotto il percorso DHCP. Allo stesso modo, i criteri di sicurezza delle VLAN guest devono consentire esplicitamente la porta UDP 67 e 68 prima di reindirizzare il traffico a un Captive Portal.
Risoluzione: Eseguire l'audit di tutte le ACL e delle regole del firewall lungo il percorso tra i client wireless, gli AP, gli switch Layer 3 e i server DHCP. Assicurarsi che le porte UDP 67 e 68 siano esplicitamente consentite in entrambe le direzioni. Durante la risoluzione dei problemi, eseguire un'acquisizione dei pacchetti sull'interfaccia di rete del server DHCP per confermare che i pacchetti DHCPDISCOVER stiano effettivamente arrivando.
8. Errori di configurazione di VLAN e Trunking
Il meccanismo: Se l'SSID di un client è mappato su una VLAN specifica, ma tale VLAN non è correttamente taggata o configurata in trunk end-to-end attraverso l'infrastruttura di switching, i broadcast DHCP del client non raggiungeranno mai il gateway predefinito o l'agente di relay DHCP.
Il contesto ad alta densità: Le reti wireless ad alta densità utilizzano l'assegnazione dinamica delle VLAN o il pooling multi-VLAN per distribuire il carico dei client. Se a una singola porta trunk dello switch lungo il percorso dall'AP allo switch core manca un tag VLAN nella sua lista dei consentiti, un sottoinsieme di client (nello specifico quelli assegnati a quella VLAN) subirà timeout DHCP immediati e persistenti, mentre altri client sullo stesso SSID si connetteranno correttamente. Ciò crea scenari di risoluzione dei problemi altamente intermittenti e difficili da diagnosticare.
Risoluzione: Implementare strumenti automatizzati di gestione e convalida della configurazione di rete. Quando si configurano le porte trunk dello switch, utilizzare sempre elenchi di elementi consentiti espliciti (ad es. switchport trunk allowed vlan 10,20,30) anziché affidarsi alle configurazioni predefinite "all", e verificare che la VLAN nativa corrisponda su entrambe le estremità del collegamento trunk per evitare perdite di traffico non taggato.
9. Bug del firmware e dei driver degli Access Point
Il meccanismo: Il firmware dell'access point è responsabile del bridging dei frame wireless 802.11 sulla rete ethernet cablata 802.3. Un bug software nel driver wireless o nel motore di bridging dell'AP può causare la perdita di pacchetti DHCP da parte dell'AP, in particolare in condizioni di carico elevato di CPU o memoria.
Il contesto ad alta densità: Le reti ad alta densità spingono l'hardware e il software degli AP al limite. Un bug che rimane latente con un carico leggero di 10 client può scatenare guasti catastrofici quando l'AP gestisce 100 client attivi simultaneamente. Ad esempio, un bug documentato all'inizio del 2026 su alcuni AP WiFi 7 causava la perdita intermittente da parte dell'AP del terzo pacchetto dell'handshake (il DHCPREQUEST), impedendo al client di ricevere il suo DHCPACK e completare l'onboarding.
Risoluzione: Mantenere una rigorosa politica di gestione del ciclo di vita per il firmware degli AP. Evitare di distribuire release di firmware "all'avanguardia" direttamente negli ambienti di produzione. Stabilire un ambiente di staging che simuli condizioni di alta densità e monitorare attentamente le note di rilascio dei fornitori e i forum della community per individuare bug noti relativi al DHCP. Se la risoluzione dei problemi rivela che i pacchetti DHCPDISCOVER vengono inviati dal client ma non vengono mai visualizzati sulla porta di uplink cablata dell'AP, sospettare un bug di bridging dell'AP.
10. Roaming aggressivo dei client e confini Layer 3
Il meccanismo: Quando un client wireless si sposta (roaming) da un AP all'altro, deve mantenere la propria sessione di rete. Se il roaming attraversa un confine Layer 3 (spostando il client su una subnet diversa), il client deve ottenere un nuovo indirizzo IP. Se il sistema operativo del client o la rete wireless non riescono a gestire questa transizione in modo fluido, il client tenterà di utilizzare il suo vecchio indirizzo IP sulla nuova subnet, causando timeout di connessione e fallimenti nella rinegoziazione DHCP.
Il contesto ad alta densità: Le sedi ad alta densità richiedono centinaia di AP per fornire una copertura adeguata. I client sono costantemente in movimento, ad esempio gli ospiti di un hotel che camminano dalle loro camere alla sala conferenze, o gli acquirenti che si spostano all'interno di un centro commerciale [7]. Se l'architettura di rete mappa diverse aree fisiche della sede su subnet differenti, si verificherà un volume elevato di roaming Layer 3, sovraccaricando il server DHCP con rapidi eventi di rilascio e richiesta.
Risoluzione: Progettare reti wireless ad alta densità utilizzando un'architettura Layer 2 piatta su tutto l'SSID del client, oppure implementare il tunnelling basato su controller wireless (come GRE o CAPWAP) [8]. Il tunnelling garantisce che il traffico di un client sia sempre ancorato al suo controller domestico e alla sua VLAN originali, indipendentemente dall'AP fisico verso cui si sposta, eliminando completamente gli eventi di roaming Layer 3 e il relativo sovraccarico DHCP.
Guida all'implementazione
Per eliminare sistematicamente i timeout DHCP, gli architetti di rete devono passare da una risoluzione dei problemi reattiva a un'architettura proattiva e standardizzata. Segui questa guida all'installazione passo dopo passo per proteggere e rafforzare la tua infrastruttura DHCP.
Passaggio 1: Dimensionamento della subnet e architettura CIDR
Non utilizzare mai subnet /24 standard per reti guest ad alta densità. Calcola i requisiti IP in base alla capacità di picco più un margine del 50% per accogliere utenti con più dispositivi e la rotazione temporanea degli utenti.
| Subnet Mask | CIDR | Indirizzi IP utilizzabili | Miglior caso d'uso |
|---|---|---|---|
255.255.255.0 |
/24 |
254 | Personale amministrativo, stampanti, IoT per il retrobottega |
255.255.254.0 |
/23 |
510 | Piccoli boutique hotel, negozi al dettaglio locali |
255.255.252.0 |
/22 |
1.022 | Grandi hotel, sale conferenze ad alta densità, campus scolastici |
255.255.248.0 |
/21 |
2.046 | Grandi padiglioni espositivi, centri commerciali, piazze pubbliche |
255.255.240.0 |
/20 |
4.094 | Stadi, arene, enormi centri congressi |
Passaggio 2: Ottimizzazione dei tempi di lease DHCP
Configura il server DHCP per applicare tempi di lease basati sul comportamento degli utenti dello specifico segmento di rete:
Guest WiFi SSID (High Churn)     -> Tempo di lease: da 30 a 60 minuti
Corporate Staff SSID (Stabile)   -> Tempo di lease: da 8 a 12 ore
Venue IoT & Infrastructure       -> Tempo di lease: 7 giorni (o prenotazione statica)
Nota: la riduzione dei tempi di lease aumenta la frequenza delle richieste di rinnovo DHCP (che si verificano al 50% della durata del lease, noto come T1) [9]. Assicurarsi che l'hardware del server DHCP disponga di prestazioni di CPU e I/O sufficienti per gestire il tasso di richieste elevate.
Step 3: Configuring DHCP Relay Agents on Layer 3 Switches
When configuring DHCP relay agents, always specify redundant helper addresses pointing to independent DHCP servers. Below is a standard, vendor-neutral configuration template for a Cisco IOS Layer 3 switch interface:
interface Vlan30
 description High_Density_Guest_WiFi
 ip address 192.168.30.1 255.255.252.0
 ip helper-address 10.10.10.10  # Server DHCP primario
 ip helper-address 10.10.10.11  # Server DHCP secondario
 ip dhcp relay information option  # Inserisci l'Opzione 82 per il tracciamento della posizione
 no shutdown
Step 4: Hardening Layer 2 Security with DHCP Snooping
Prevent rogue DHCP servers and mitigate DHCP starvation attacks by enabling DHCP snooping across your entire switching fabric. Below is a configuration template for an edge access switch:
# Abilita il DHCP snooping a livello globale
ip dhcp snooping

# Abilita il DHCP snooping per VLAN client specifiche
ip dhcp snooping vlan 10,20,30

# Configura la porta di uplink verso lo switch core/server DHCP come ATTENDIBILE (TRUSTED)
interface GigabitEthernet1/0/48
 description UPLINK_TO_CORE
 ip dhcp snooping trust

# Configura le porte rivolte verso i client come NON ATTENDIBILE (UNTRUSTED) e limita la frequenza dei pacchetti DHCP per prevenire attacchi di starvation
interface range GigabitEthernet1/0/1 - 47
 description CLIENT_ACCESS_PORTS
 ip dhcp snooping limit rate 15
Best Practice
Per mantenere una rete wireless resiliente e ad alte prestazioni, integra queste best practice standard del settore nei tuoi runbook operativi:
1. Implementare l'Opzione DHCP 82 (Relay Agent Information Option)
L'Opzione DHCP 82 consente al relay agent di inserire informazioni specifiche sul circuito (come l'ID della porta dello switch o l'indirizzo MAC dell'AP) nella richiesta DHCP prima di inoltrarla al server [10]. Ciò consente al server DHCP di applicare criteri di allocazione IP altamente granulari in base alla posizione fisica del client all'interno della struttura. Ad esempio, un hotel può assegnare pool IP o impostazioni DNS diversi ai client nel centro congressi rispetto a quelli nelle camere degli ospiti, ottimizzando l'utilizzo del pool.
2. Abilitare la conversione da Broadcast a Unicast per ARP e DHCP
Configura il controller LAN wireless (WLC) o gli AP gestiti in cloud per intercettare i pacchetti ARP e DHCP broadcast Layer 2 e convertirli in frame unicast prima di trasmetterli via etere. Poiché i frame unicast vengono trasmessi alla massima velocità di trasmissione dati supportata dal client (anziché alla velocità di broadcast obbligatoria più bassa), questa semplice modifica della configurazione riduce drasticamente il consumo di tempo di trasmissione RF (airtime) e migliora l'affidabilità del DHCP in ambienti ad alta densità.
3. Stabilire un monitoraggio e un sistema di avvisi DHCP proattivi
Non aspettare che gli utenti segnalino errori di connessione. Configura il tuo Network Management System (NMS) o gli strumenti di monitoraggio del server DHCP per tracciare le metriche chiave e attivare avvisi immediati:
- Utilizzo del pool: Attiva un avviso di avvertimento (warning) al 75% di utilizzo e un avviso critico all'85%.
- Frequenza delle richieste DHCP: Monitora eventuali picchi improvvisi di richieste, che possono indicare una tempesta di broadcast (broadcast storm), un loop di roaming o un attacco di DHCP starvation.
- Distribuzione della scadenza dei lease: Assicurati che i lease scadano in modo uniforme e che il database stia recuperando attivamente gli indirizzi IP.
Risoluzione dei problemi e mitigazione dei rischi
Quando si sospetta un timeout DHCP, segui questo flusso di lavoro diagnostico sistematico per isolare rapidamente il punto di guasto e ridurre al minimo l'interruzione dell'attività.
[Il client si associa all'AP]
        │
        ▼
[Cattura pacchetti sul client] ───► DHCPDISCOVER inviato?
        │                           ├── NO: Problema del driver/OS del client.
        │                           └── SÌ
        ▼
[Cattura pacchetti sullo switch] ──► DHCPDISCOVER arriva allo switch?
        │                           ├── NO: Problema di bridging AP/tagging VLAN.
        │                           └── SÌ
        ▼
[Cattura pacchetti sul server] ───► DHCPDISCOVER arriva al server?
        │                           ├── NO: Problema di Relay Agent / Routing / Firewall.
        │                           └── SÌ
        ▼
[Controlla i log del server] ─────► DHCPOFFER inviato?
                                    ├── NO: Pool esaurito / Ambito non attivo.
                                    └── SÌ: Percorso di ritorno bloccato (VLAN/Routing).
Comandi chiave per la risoluzione dei problemi
Per verificare lo stato del DHCP e diagnosticare i guasti sulle apparecchiature di rete attive, utilizza i seguenti comandi:
Cisco IOS (Server DHCP o Relay)
# Visualizza l'utilizzo del pool DHCP e gli indirizzi liberi
show ip dhcp pool

# Visualizza le associazioni di indirizzi IP attive (binding)
show ip dhcp binding

# Monitora le statistiche del server DHCP (conteggi di discover, request, ack)
show ip dhcp server statistics

# Visualizza il database dei conflitti DHCP (IP contrassegnati come non validi a causa di conflitti)
show ip dhcp conflict
Linux (Server DHCP o Client)
# Visualizza le richieste di lease del client DHCP in tempo reale su un client Linux
sudo dhclient -v wlan0

# Cattura il traffico DHCP (porte UDP 67 e 68) su un'interfaccia specifica
sudo tcpdump -i eth0 -n -vv 'udp and (port 67 or port 68)'

# Controlla il database dei lease DHCP di dnsmasq
cat /var/lib/misc/dnsmasq.leases
Windows (Client DHCP)
# Rilascia l'indirizzo IP corrente
ipconfig /release

# Rinnova l'indirizzo IP (avvia un nuovo handshake DHCP)
ipconfig /renew
ROI e impatto aziendale
Investire in un'infrastruttura DHCP altamente resiliente e ben progettata non è una semplice necessità tecnica, ma un fattore abilitante fondamentale per il business che influisce direttamente sui profitti e sull'efficienza operativa.
Quantificare il valore aziendale di un onboarding senza interruzioni
- Miglioramento della Guest Experience e fidelizzazione del brand: Nei settori dell'ospitalità e degli eventi, la connettività wireless è uno dei principali fattori di soddisfazione degli ospiti. Un ospite che riscontra attriti durante l'onboarding ha un'alta probabilità di lasciare recensioni negative, con un impatto diretto sui tassi di prenotazione. L'eliminazione dei timeout DHCP garantisce una prima impressione senza ostacoli.
- Massimizzare il ROI del marketing tramite Guest WiFi: Per i punti vendita e i luoghi di intrattenimento, il Guest WiFi è un potente strumento di marketing canale. Garantendo un tasso di onboarding riuscito al 100%, i team di marketing possono acquisire più dati di prima parte (come e-mail, dati demografici e modelli di traffico pedonale) tramite WiFi Analytics , guidando campagne di engagement altamente mirate e aumentando il customer lifetime value.
- Riduzione del sovraccarico del supporto IT: I ticket relativi al DHCP ("Impossibile connettersi al WiFi", "Errore indirizzo IP") sono tra le richieste più frequenti e dispendiose in termini di tempo per gli helpdesk IT. Implementando la ridondanza DHCP, il dimensionamento corretto dei pool e la distribuzione del DHCP snooping, le organizzazioni possono ridurre i ticket di supporto relativi al wireless fino al 40%, consentendo al personale IT di concentrarsi su iniziative strategiche anziché sulla risoluzione di problemi di base.
- Garantire la conformità normativa e la sicurezza: L'implementazione del DHCP snooping e la mitigazione dei server DHCP non autorizzati supportano direttamente la conformità ai principali standard di sicurezza, come PCI DSS (per gli ambienti di pagamento al dettaglio) e GDPR (mettendo in sicurezza le reti di dati degli ospiti). Un'architettura DHCP sicura e ben documentata riduce il rischio di costose violazioni dei dati e sanzioni normative.
Tabella riassuntiva dell'impatto aziendale
| Metrica | Prima dell'ottimizzazione | Dopo l'ottimizzazione | Impatto aziendale |
|---|---|---|---|
| Tasso di timeout DHCP | 8,5% (Nelle ore di punta) | < 0,1% | Onboarding degli utenti fluido, eliminazione dei reclami di connessione |
| Tempo medio di risoluzione (MTTR) | 45 minuti | < 5 minuti | Risoluzione rapida dei problemi tramite mappatura documentata di VLAN/scope |
| Tasso di opt-in WiFi ospiti | 62% | 88% | Maggiore crescita del database di marketing, acquisizione di dati più ricchi |
| Volume dei ticket di supporto IT | Alto (errori DHCP/IP) | Trascurabile | Riduzione del 40% dei ticket di helpdesk relativi al wireless |
Riferimenti
- IETF RFC 2131 - Dynamic Host Configuration Protocol
- IEEE 802.11-2020 - Wireless LAN Medium Access Control and Physical Layer Specifications
- Ottimizzazione dei tempi di lease DHCP WiFi per i dispositivi mobili
- IETF RFC 3046 - DHCP Relay Agent Information Option
- IETF RFC 8156 - DHCPv4 Failover Protocol
- Cisco Systems - Configurazione del DHCP Snooping
- Perché il WiFi degli stadi si blocca (e come risolvere il problema)
- HPE Aruba Networking - Guida alla progettazione e all'implementazione del Wi-Fi in grandi spazi pubblici
- Come risolvere i problemi DHCP sulle reti WiFi
- IETF RFC 3993 - Subscriber-ID Sub-Option for DHCP Relay Agent Information Option
Definizioni chiave
DHCP (Dynamic Host Configuration Protocol)
A network management protocol used on Internet Protocol (IP) networks whereby a DHCP server dynamically assigns an IP address and other network configuration parameters to each device on a network so they can communicate with other IP networks.
DHCP is the critical first step in wireless onboarding; if it fails, clients cannot access any network resources, including guest portals.
DORA Process
The standard four-step sequence of messages exchanged between a DHCP client and server to negotiate an IP address lease: DHCPDISCOVER, DHCPOFFER, DHCPREQUEST, and DHCPACK.
Understanding the DORA sequence is essential for diagnosing where a DHCP handshake is failing during network troubleshooting.
DHCP Relay Agent
Any host or network device (typically a Layer 3 switch or router) that forwards DHCP packets between clients and servers when they reside on different subnets or VLANs.
Relay agents are required in segmented enterprise networks to centralize DHCP services and prevent broadcast traffic from crossing router boundaries.
DHCP Snooping
A Layer 2 security feature built into managed switches that filters untrusted DHCP messages and builds a binding database of trusted MAC-to-IP mappings.
DHCP snooping is the primary defence against rogue DHCP servers and man-in-the-middle attacks on enterprise wireless networks.
IP Pool Exhaustion
A condition that occurs when all available IP addresses within a DHCP server's configured scope have been leased out, leaving no addresses available for new clients.
Pool exhaustion is the leading cause of DHCP timeouts in high-density venues and is resolved by right-sizing scopes or reducing lease times.
DHCP Lease Time
The duration of time for which a DHCP server allocates an IP address to a specific client device before the client must request a lease renewal.
Optimizing lease times based on user behavior (short for guest networks, longer for staff) is critical to maintaining IP pool efficiency.
Rogue DHCP Server
An unauthorized DHCP server connected to a network, which hands out invalid or malicious IP configurations to clients, leading to connectivity issues and security vulnerabilities.
Rogue servers are common in open public venues and are neutralized by enabling DHCP snooping on access switches.
Broadcast Suppression
A network configuration technique that limits the rate of broadcast and multicast traffic on a VLAN or switch port to prevent network congestion and broadcast storms.
Broadcast suppression is critical in high-density wireless networks to protect RF airtime and ensure that critical DHCP packets are not delayed.
Esempi pratici
A high-density conference centre with a main plenary hall designed to seat 2,500 attendees is experiencing massive WiFi onboarding failures during the opening keynote. Attendees report that their devices are stuck on 'Obtaining IP address' for several minutes, and those who do connect are frequently disconnected when moving between the plenary hall and the exhibition area. The current network configuration uses a single client VLAN mapped to a standard `/24` subnet with a 24-hour DHCP lease time, served by a single core router. How should this network be re-architected to eliminate these failures?
To resolve these onboarding failures, the network architecture must be redesigned to handle high-density transient client behavior. Follow this multi-step remediation workflow:
Expand the IP Address Space (Subnet Sizing): Replace the standard
/24subnet (which only provides 254 IP addresses) with a/21subnet (providing 2,046 usable IP addresses) or implement a multi-VLAN pool. This ensures that the IP pool is sufficiently sized to handle 2,500 concurrent attendees, many of whom will carry multiple connected devices (average of 1.5 devices per attendee = 3,750 required IPs). If a single flat/20subnet (4,094 IPs) is used, it will easily accommodate the entire event capacity.Optimize DHCP Lease Times: Reduce the DHCP lease time from 24 hours to 45 minutes on the guest wireless network. Since conference attendees are highly transient and move in and out of the plenary hall, a short lease time ensures that IP addresses are rapidly reclaimed from devices that have left the area, preventing artificial pool exhaustion.
Deploy Redundant DHCP Servers: Eliminate the single point of failure by deploying a redundant DHCP server pair. Configure Windows Server DHCP Failover in Load Balance mode (50/50 split) across two independent virtual machines, or use a dedicated high-availability DHCP appliance. This ensures that if one server or network path fails, the remaining server can handle the entire request load.
Implement Layer 2 Broadcast Suppression and DHCP Proxy: Enable broadcast suppression on the wireless controller, limiting broadcast traffic to 100 packets per second. Enable DHCP Proxy on the access points to convert broadcast
DHCPOFFERandDHCPACKmessages into unicast frames. This drastically reduces wireless airtime consumption and prevents packet collisions.Configure DHCP Snooping and ARP Validation: Enable DHCP snooping on all access switches to protect the network from rogue DHCP servers and prevent DHCP starvation attacks. Limit the DHCP packet rate on client-facing ports to 15 packets per second.
A 500-room luxury hotel is deploying a new guest SSID across its entire property. The network team has created a new guest VLAN (VLAN 50) and configured a central Windows DHCP server with a corresponding `/22` scope. However, during testing, devices associated with the guest SSID in the hotel rooms are failing to obtain an IP address and are timing out, whereas devices connected directly to the wired ports in the administrative offices (VLAN 10) are obtaining IP addresses instantly. What is the most likely cause of this issue, and how should it be diagnosed and resolved?
The fact that wired clients on VLAN 10 are obtaining IP addresses while wireless clients on VLAN 50 are timing out indicates that the issue is specific to VLAN 50's path or configuration. The most likely cause is a missing or misconfigured DHCP Relay Agent (IP Helper) on the Layer 3 switch interface for VLAN 50, or a missing VLAN tag along the trunk path between the Access Points and the core switch. Follow this diagnostic and resolution workflow:
Verify DHCP Relay Agent Configuration: Log in to the core Layer 3 switch (or gateway) and inspect the configuration for the VLAN 50 interface. Ensure that the
ip helper-addresscommand is present and points to the correct IP address of the Windows DHCP server. If the command is missing, the switch will not forward the client's broadcastDHCPDISCOVERpackets to the DHCP server.Check VLAN Trunking End-to-End: Verify that VLAN 50 is tagged on all switch ports along the path from the APs to the core switch. Use commands like
show interfaces trunkon Cisco switches to confirm that VLAN 50 is allowed and active on all trunk links. If VLAN 50 is missing from even a single trunk port, client DHCP broadcasts will be dropped before reaching the Layer 3 switch.Perform Packet Captures: To isolate the failure point, perform simultaneous packet captures at three locations:
- On the wireless client (using Wireshark or native OS tools) to confirm that
DHCPDISCOVERbroadcasts are being sent. - On the Layer 3 switch interface for VLAN 50 to confirm that the switch is receiving the broadcasts.
- On the DHCP server's network interface to confirm that the forwarded unicast DHCP packets are arriving.
- On the wireless client (using Wireshark or native OS tools) to confirm that
Verify DHCP Server Scope Activation: Ensure that the DHCP scope for the VLAN 50 subnet (e.g., 192.168.50.0/22) is fully created, activated, and has an active range of IP addresses that does not conflict with any static assignments.
Apply the Configuration Fix: On the core Layer 3 switch, apply the correct helper address configuration:
interface Vlan50
 description Guest_WiFi_VLAN
 ip address 192.168.50.1 255.255.252.0
 ip helper-address 10.10.10.10  # Windows DHCP Server IP
 no shutdown
A large shopping mall with over 150 retail stores is experiencing highly intermittent WiFi connection drops. The IT team reports that some shoppers connect instantly and browse without issue, while others in the same location are stuck on 'Obtaining IP address' or receive a 'No Internet Connection' warning. A review of the DHCP server logs shows thousands of active leases, but also a high volume of 'DHCP Conflict' errors and several instances where the server is responding to clients with a `DHCPNAK` (Negative Acknowledgement). How should this issue be investigated and resolved?
The presence of 'DHCP Conflict' errors and DHCPNAK responses in the server logs strongly suggests the presence of a rogue DHCP server on the network or an IP address conflict caused by static assignments within the DHCP range. Follow this systematic investigation and remediation workflow:
Isolate and Detect the Rogue DHCP Server: Use DHCP snooping database logs on your access switches to identify unauthorized DHCP server activity. Run the following command on your core and access switches to view any detected conflicts or untrusted DHCP packets:
show ip dhcp snooping database
show ip dhcp conflict
The conflict database will list the MAC addresses of devices that have responded to ARP probes for IPs that the DHCP server was attempting to assign, or devices that are actively handing out unauthorized leases.
Enable DHCP Snooping Globally and on Client VLANs: To immediately neutralize any rogue DHCP servers, enable DHCP snooping on all switches. Configure all client-facing ports as untrusted, and only trust the specific ports connected to your legitimate DHCP servers or core trunk links. This ensures that any unauthorized
DHCPOFFERorDHCPACKpackets are dropped at the switch port before they can reach other clients.Configure ARP Inspection (DAI): To prevent clients from using spoofed IP addresses or causing IP conflicts, enable Dynamic ARP Inspection (DAI) on the client VLANs. DAI uses the DHCP snooping binding database to validate ARP packets, dropping any packets with invalid MAC-to-IP mappings:
ip arp inspection vlan 10,20,30Exclude Static IPs from the DHCP Pool: Ensure that any static IP addresses assigned to infrastructure devices (such as printers, APs, or digital signage) are explicitly excluded from the DHCP scope range on the server to prevent the server from accidentally offering those IPs to clients.
Deploy Port Security and 802.1X: For wired ports in retail stores or public areas, implement Port Security to limit the number of MAC addresses allowed on a port, or deploy 802.1X authentication to prevent unauthorized devices from connecting to the physical network fabric.
Domande di esercitazione
Q1. An IT Manager at a large shopping mall notices that during peak holiday shopping hours, guest WiFi connections fail frequently. The DHCP server log is flooded with 'DHCP Scope Full' errors. The current guest VLAN is configured with a `/23` subnet mask and a default 24-hour lease time. What are the two most immediate and effective configuration changes the manager should implement to resolve this issue, and why?
Suggerimento: Consider the relationship between subnet size, client dwell time, and IP address reclamation.
Visualizza risposta modello
The manager should implement the following two immediate configuration changes:
Reduce the DHCP Lease Time: Decrease the lease time from 24 hours to 30 or 45 minutes. Because shopping mall visitors are highly transient (typical dwell time is 1-2 hours), a 24-hour lease causes the DHCP server to hold IP addresses long after guests have departed. Reducing the lease time ensures that IP addresses are rapidly reclaimed and made available for new shoppers, effectively multiplying the capacity of the existing pool without changing the subnet structure.
Expand the Subnet Scope (CIDR Sizing): Expand the guest VLAN subnet from a
/23(providing 510 usable IP addresses) to a/21(providing 2,046 usable IP addresses) or a/20(providing 4,094 usable IP addresses). A/23subnet is far too small for a large shopping mall during peak hours, especially considering that many shoppers carry multiple connected devices (phones, wearables, tablets). Expanding the scope ensures there are plenty of IP addresses available to handle the peak concurrent device load.
These two changes work in tandem: the subnet expansion increases the absolute pool capacity, while the lease time reduction ensures maximum efficiency in address reuse, completely eliminating 'DHCP Scope Full' errors.
Q2. A network engineer is troubleshooting a newly deployed guest SSID at a hotel. Wireless clients associate to the AP successfully but fail to obtain an IP address, timing out after several seconds. A packet capture on the switch port connected to the AP shows `DHCPDISCOVER` broadcasts entering the switch, but a capture on the central DHCP server's network interface shows no incoming packets from the hotel's guest subnet. The DHCP server is located on a different subnet (10.10.10.0/24) than the guest wireless clients (192.168.50.0/22). What configuration is missing, on which device must it be applied, and what is the exact command to apply it?
Suggerimento: Since the DHCP server is on a different subnet than the clients, a Layer 3 device must forward the broadcast traffic.
Visualizza risposta modello
The missing configuration is the DHCP Relay Agent (IP Helper). Because DHCP discovery messages are Layer 2 broadcasts, they cannot cross the router or Layer 3 boundary between the client guest subnet (192.168.50.0/22) and the DHCP server subnet (10.10.10.0/24). Without a relay agent, the switch or router will drop the broadcast packets, preventing them from reaching the server.
This configuration must be applied on the Layer 3 Switch or Security Gateway that acts as the default gateway for the guest wireless VLAN (VLAN 50).
Assuming a Cisco IOS Layer 3 switch, the engineer must apply the ip helper-address command to the VLAN 50 interface, pointing to the IP address of the central DHCP server (e.g., 10.10.10.10):
interface Vlan50
 description Guest_WiFi_Gateway
 ip address 192.168.50.1 255.255.252.0
 ip helper-address 10.10.10.10
 no shutdown
This command instructs the switch to intercept DHCP broadcasts on VLAN 50, convert them into Layer 3 unicast packets with a source IP of the VLAN 50 gateway (192.168.50.1), and forward them directly to the DHCP server at 10.10.10.10. The server will then use the gateway IP to select the correct scope and return an offer.
Q3. A stadium network architect is designing a wireless network to support 50,000 concurrent fans. To minimize broadcast traffic and RF airtime consumption, the architect wants to implement broadcast suppression and convert DHCP broadcasts to unicast. However, some junior engineers express concern that converting DHCP broadcasts to unicast will break the DHCP protocol, as clients do not yet have an IP address to receive unicast packets. How should the architect explain the technical mechanism of broadcast-to-unicast conversion to address these concerns?
Suggerimento: Consider how the Access Point bridges Layer 2 frames and how the client's MAC address is used in the 802.11 header.
Visualizza risposta modello
The architect should explain that converting DHCP broadcasts to unicast does not break the DHCP protocol because the Access Point (AP) operates at Layer 2 and can target frames directly to the client's physical MAC address, even if the client does not yet have an IP address.
Here is the technical mechanism:
The Client's MAC Address is Known: During the initial association phase, the client establishes a secure Layer 2 connection with the AP. The AP knows the client's unique MAC address and associates it with a specific virtual port and radio interface.
The AP Intercepts the Broadcast: When the DHCP server sends a
DHCPOFFERorDHCPACKas a Layer 2 broadcast (destination MACFF:FF:FF:FF:FF:FF), the AP intercepts this packet on its wired interface.Conversion to Unicast: Instead of transmitting the packet over the air as a broadcast frame (which would force all clients on the channel to wake up and process it at the lowest mandatory data rate), the AP modifies the 802.11 MAC header. It changes the destination MAC address from the broadcast address to the specific client's unicast MAC address (which it extracted from the DHCP packet's client hardware address field,
chaddr).High-Speed Transmission: Because the frame is now a unicast frame, the AP can transmit it using the client's maximum supported data rate (using beamforming, MIMO, and high-order modulation like QAM). It also benefits from 802.11 Layer 2 acknowledgements (ACKs), ensuring reliable delivery.
Client Processing: The client's wireless card receives the unicast frame, recognizes its own MAC address in the 802.11 header, and passes the payload (the DHCP offer or ack) up the network stack. The client's operating system processes the DHCP payload normally, completely unaware that the frame was converted from broadcast to unicast over the air.
This explanation demonstrates that broadcast-to-unicast conversion is a Layer 2 optimization that leverages the 802.11 MAC layer to protect RF airtime, without altering the Layer 3 DHCP protocol payload.
Continua a leggere questa serie
Guida passo-passo alla diagnosi dei problemi di roaming WiFi
Questa guida completa fornisce ai leader IT aziendali e agli architetti di rete una metodologia autorevole e passo-passo per diagnosticare e risolvere i problemi di roaming WiFi. Combinando approfondimenti tecnici sugli standard IEEE 802.11k/v/r con casi di studio reali e analisi a livello di pacchetto, questo riferimento consente ai team di eliminare il problema dello 'sticky client' e offrire una connettività mobile fluida. Copre l'intero flusso di lavoro diagnostico, dai rilievi del sito RF e gli audit di configurazione dei controller fino all'analisi dell'acquisizione dei pacchetti over-the-air e alla validazione post-risoluzione.
Perché il WiFi del tuo Stadio si Blocca (e Come Risolverlo)
Questa autorevole guida tecnica esamina la causa principale della congestione del WiFi negli stadi — il "chiacchiericcio" simultaneo in background di 50.000 dispositivi che caricano pubblicità programmatiche e telemetria — e fornisce un progetto architettonico dettagliato per l'implementazione del filtraggio DNS edge come strategia di mitigazione primaria. Progettata per IT Director, CTO e Network Architect, offre indicazioni pratiche per l'implementazione, casi di studio reali e framework di ROI misurabili per aiutare gli operatori delle sedi a recuperare larghezza di banda e fornire connettività ad alte prestazioni su larga scala.
Risolvere l'errore 'Connesso ma senza Internet' sul Guest WiFi
Questa guida tecnica di riferimento autorevole spiega come i timeout DNS causati da reti congestionate scatenano l'errore 'Connesso, senza Internet' sul Guest WiFi. Fornisce ad architetti di rete e responsabili IT passaggi di implementazione attuabili per distribuire filtri DNS aziendali al fine di risolvere questi colli di bottiglia e migliorare l'onboarding degli ospiti.