

A professional Wi-Fi scan is far more than a simple signal check. It’s a vital diagnostic tool for understanding the health, security, and performance of your entire wireless environment, revealing hidden problems that basic tools simply can't see.
Why a Professional Wi-Fi Scan Is Essential

Before we get into the nuts and bolts of how to perform a scan, it’s crucial to understand why it matters. Viewing a Wi-Fi scan as just another IT chore is a huge missed opportunity. It’s actually a strategic necessity for building a secure, reliable, and high-performing wireless network—the very foundation of modern business in any sector, from hospitality and retail to healthcare.
Regular, in-depth scans give you a data-backed blueprint of your wireless landscape. This isn’t just about finding the strongest signal; it's about proactively managing your radio frequency (RF) environment.
Uncover Critical Security Threats
One of the most immediate pay-offs from a thorough Wi-Fi scan is shoring up your security. An unmanaged wireless network is effectively an open door for all kinds of threats. A professional scan helps you find and neutralise these risks before they can cause any real damage.
Here are a few of the critical threats a scan helps you tackle:
- Detecting Rogue Access Points (APs): These are unauthorised devices plugged into your network, creating massive security holes. A scan reveals every single broadcasting device, letting you instantly spot any AP that isn’t on your authorised list.
- Identifying Weak Security Protocols: Still relying on outdated WPA or, even worse, WEP security? A scan flags networks with weak encryption right away, giving you the push needed to upgrade to stronger standards like WPA3.
- Spotting "Evil Twin" Attacks: This is a nasty attack where a malicious actor mimics your legitimate network SSID to trick users into connecting. A scan can help you identify suspicious APs that share your network's name but have a different BSSID or unusual signal characteristics.
A single rogue AP can bypass every perimeter security measure you have in place. Regular scans are your first line of defence in the wireless domain, shifting your security posture from reactive to proactive.
Troubleshoot Frustrating Performance Drops
"The Wi-Fi is slow" is one of the most common and frustrating complaints any IT team faces. A proper Wi-Fi scan takes you from guesswork to a targeted diagnosis, giving you the hard evidence needed to see exactly why performance is suffering.
For instance, a scan visually maps out channel interference. In a crowded office building or a busy hotel, multiple APs broadcasting on the same or overlapping channels will constantly "talk over" each other. The result? Dropped connections and sluggish speeds for everyone.
The scan shows you this congestion clearly, allowing you to reconfigure your APs to use non-overlapping channels (like 1, 6, and 11 on the 2.4 GHz band) and instantly improve performance.
Plan for a Flawless User Experience
Finally, a comprehensive scan is fundamental when deploying advanced authentication and guest access solutions. Platforms like Purple , which deliver secure, passwordless access through technologies like Passpoint and OpenRoaming , depend on a stable and optimised network foundation.
A scan validates that you have solid coverage, ensures seamless roaming between APs, and confirms the RF environment is clean before you roll out a new user-facing service.
This foundational work is what prevents a poor user experience and ensures your investment in a solution like Purple delivers its full potential. With reliable internet access now a baseline expectation, this preparatory step is absolutely indispensable.
Assembling Your Wi-Fi Scanning Toolkit

The quality of any Wi-Fi scan comes down to the tools you have at your disposal. Much like a good mechanic has more than just one spanner, a network professional needs a varied toolkit to get a real grip on different wireless challenges.
Your choice of tool really dictates the depth of information you can pull, taking you from quick spot-checks all the way to full-blown professional site surveys. Let's walk through the options, starting with the basics built into your computer and levelling up to the pro-grade software the experts use.
Native OS Commands for Quick Diagnostics
Sometimes you just need a quick, no-frills look at the networks around you without installing a thing. Every major operating system has command-line tools baked in that are perfect for this. They are your first port of call for an immediate answer.
On a Windows machine, the netsh wlan show networks mode=bssid command is surprisingly powerful. It gives you a list of every visible network along with its BSSID (the access point's unique MAC address), signal strength, channel, and security setup. It’s fantastic for a fast check to see if your device can even see the network you’re troubleshooting.
Over on macOS, the airport command is your go-to. Just run /System/Library/PrivateFrameworks/Apple80211.framework/Versions/Current/Resources/airport -s in your terminal. This gives you a live list of networks showing their RSSI (signal strength), BSSID, and channel. It's an invaluable first step for any quick environmental check from a MacBook.
Mobile Apps for On-the-Go Analysis
When you need to be mobile and want a more visual feel, a mobile app is the logical next step. These apps effectively turn your smartphone into a capable, portable network scanner. They’re ideal for walking a site to hunt down coverage dead zones or identify interference on the fly.
Android users have plenty of choices, with apps like the classic WiFi Analyzer being a firm favourite for years. These apps give you real-time graphs that clearly show channel overlap, which is a brilliant way to visually explain why a network on the crowded 2.4 GHz band is performing so poorly. If you're looking for more advanced features, a dedicated WiFi analyzer application can unlock even deeper insights.
For iPhone and iPad users, the options are a bit more restricted due to iOS security policies. However, Apple's own AirPort Utility app has a scanner hidden inside. You just need to enable it in your iOS settings, and it will give you a continuous scan of nearby networks, complete with RSSI and channel data.
A mobile app is your best friend for 'walk-around' troubleshooting. It gives you immediate visual feedback on how signal strength changes as you move through a building, helping you pinpoint problem areas in minutes.
Wi-Fi Scan Tool Comparison
Choosing the right tool depends entirely on the job. A quick command-line check is great for an instant snapshot, but for planning an entire office layout, you'll need something far more robust. This table breaks down the main types of tools and where they shine.
| Tool Type | Primary Use Case | Key Data Provided | Best For |
|---|---|---|---|
| OS Commands | Quick, on-the-spot network checks | SSIDs, BSSIDs, Signal, Channel, Security | IT pros needing a fast, software-free look. |
| Mobile Apps | On-the-go analysis and troubleshooting | Live signal graphs, Channel overlap, Basic heatmaps | Spot-checking coverage and finding interference. |
| Packet Analysers | Deep-dive traffic and protocol analysis | Full packet decodes, Management frames, Client behaviour | Advanced troubleshooting of protocol issues. |
| Pro Software | Site surveys, network design, reporting | Predictive models, RF heatmaps, Spectrum analysis | Enterprise network design, validation, and maintenance. |
Each tool provides a different piece of the puzzle. Combining them gives you a complete picture of your wireless environment, from the high-level overview down to the individual data packets.
Professional Software for Comprehensive Site Surveys
For enterprise-level network design, post-deployment validation, and serious troubleshooting, it's time to graduate to professional desktop software. These are the heavy hitters, designed for deep analysis and producing the detailed reports that businesses rely on.
Tools like inSSIDer , NetSpot , or the industry-standard Ekahau suite offer features that go miles beyond basic scanning. With these, you can:
- Create visual heatmaps: By uploading a floor plan, you can walk the area to map out signal strength, channel interference, and data rates, generating a detailed visual report.
- Perform spectrum analysis: When paired with a compatible hardware dongle, these tools can "see" non-Wi-Fi interference from sources like microwaves, Bluetooth devices, and wireless cameras.
- Track client roaming: They can monitor how a device moves between access points, which is essential for diagnosing tricky roaming problems.
While these professional tools represent an investment, they are absolutely essential for anyone managing a large-scale or business-critical wireless network. They provide the definitive data you need to design, deploy, and maintain a high-performing Wi-Fi environment.
Conducting Active vs Passive Scans
When you fire up a Wi-Fi scanning tool, it’s not just doing one thing. Behind the scenes, there are two very different methods at play for gathering information: passive and active scanning. Knowing the difference isn't just for tech-heads; it’s key to getting the right data for the job, whether you're mapping out a new site or troubleshooting a performance issue.
Think of a passive scan as quietly eavesdropping on a conversation. Your scanning device—whether it's your laptop, phone, or a dedicated air tool—simply listens for the signals already flying through the air. It’s tuning in for beacon frames, which are the regular announcements that access points (APs) broadcast to declare their presence.
This method is wonderfully efficient and completely non-intrusive. Because the scanner isn’t transmitting anything itself, it doesn’t add any noise to the very RF environment it’s trying to measure. This makes it the perfect way to get a clean, comprehensive inventory of every network in earshot.
The Power of Passive Scanning
A passive Wi-Fi scan is all about discovery. It’s your go-to for building a complete picture of the wireless landscape around you, and the information it gathers is the foundation for any serious network analysis.
With a passive scan, you can:
- Discover all nearby SSIDs: It catalogues every network broadcasting its name, showing you exactly what your users see.
- Identify BSSIDs: It lists the unique hardware addresses of all the APs. This is vital for understanding your network's physical layout and, crucially, for spotting rogue devices.
- Map channel usage: You get a clear view of which channels are the most congested without influencing the traffic yourself.
- Uncover hidden networks: Even though these networks don't broadcast their names (SSIDs) in beacons, the beacon frames themselves are still sent out. Passive scans can spot these transmissions, often flagging them as unnamed networks, giving you a strong clue that a non-broadcasting AP is operating nearby.
A passive scan is your primary reconnaissance tool. It provides a pure, uninfluenced snapshot of the RF environment—the essential first step for any site survey or security audit.
Getting Proactive with Active Scans
If a passive scan is like listening, an active scan is like walking into the room and asking a direct question. Instead of just waiting for beacons, the scanning device actively sends out its own signals called probe requests. These are essentially broadcast messages asking, "Which networks are out there?"
When an AP hears a probe request, it fires back a probe response loaded with details about the network it serves. This direct back-and-forth makes active scanning fundamentally different and far better suited for certain tasks.
One of the most powerful uses for an active scan is to reliably uncover hidden networks. By sending out a probe request that includes the specific name (SSID) of the hidden network you're looking for, you can coax a direct response from it. This is exactly how your own devices connect to your hidden home or corporate network; they don't just listen, they actively ask for it by name.
Measuring What Truly Matters
The real magic of an active scan, however, is its ability to measure real-world performance. Because the scanning device is actively engaging with the AP, it can move beyond simply listening and start simulating what a real user would actually experience.
This two-way conversation allows you to measure critical performance metrics that a passive scan can't touch:
- Connection time: How long does it actually take to associate with the AP?
- Round-trip time (RTT): This measures the latency between your device and the AP, a key indicator of how responsive the connection feels.
- Data rates: By sending and receiving packets, an active scan can measure actual throughput, not just the theoretical speed advertised by the AP.
This makes active scans essential for validating network performance. You can walk through a hotel, retail store, or hospital, running active scans to confirm that users will have a fast and responsive connection in every corner, not just a strong signal. Ultimately, combining both methods gives you the complete view—passive for the big picture and active for the critical performance details.
How To Read Wi-Fi Scan Results Like a Pro
Running a Wi-Fi scan is the easy part. What comes next is a screen packed with SSIDs, dBm values, and channel numbers that, without the right know-how, can feel like just a wall of noise. This is where the real work begins: turning that raw data into clear, actionable insights that will actually improve your network.
This quick decision tree can help you choose whether a passive or active scan better suits your immediate goal.
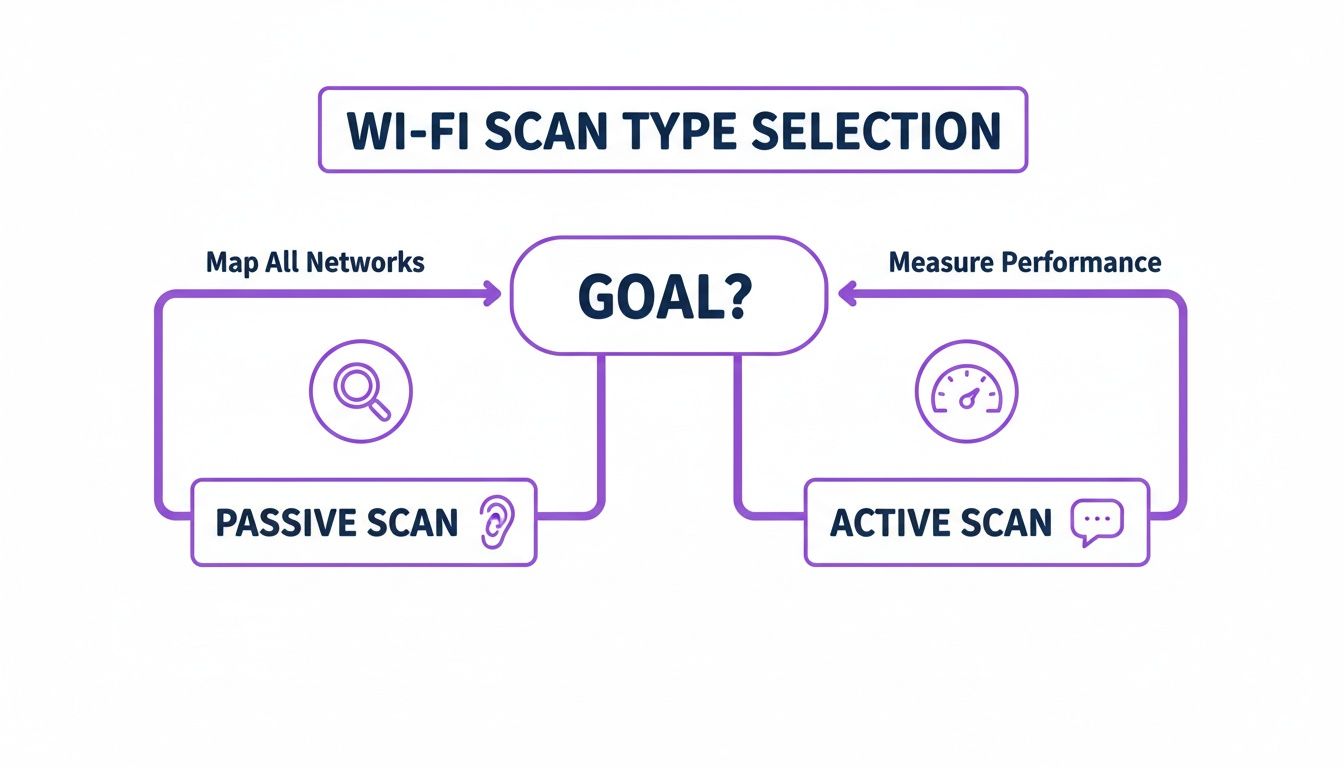
The flowchart breaks down the fundamental choice: use passive scans when you need to discover and map out what’s in your airspace, and switch to active scans when you want to measure real-world performance.
Decoding Signal Strength: RSSI
The first metric you'll notice in any Wi-Fi scan is the RSSI, or Received Signal Strength Indicator. It’s measured in negative decibels-milliwatts (-dBm), which can be a bit counter-intuitive. Just remember it's an inverse scale, so a number closer to zero means a stronger signal.
So, what do these numbers actually mean for someone trying to use your network?
- -30 dBm: Maximum signal. You’re practically standing on top of the access point.
- -55 dBm to -67 dBm: This is the sweet spot. A signal in this range is excellent for everything from reliable video calls to large file transfers.
- -70 dBm: Generally seen as the minimum for a reliable service. Voice over Wi-Fi (VoWiFi) might start to get a bit choppy here.
- -80 dBm to -90 dBm: At this point, the connection becomes pretty much unusable. A device might hang on, but even basic web browsing will be a frustrating, stop-start experience.
As you walk around a site, keep a close eye on these values. If you see areas dipping below -70 dBm, you’ve just found a coverage black spot. This tells you exactly where you might need to move an existing AP or add a new one.
Visualising this data across your floor plan is incredibly powerful. You can learn more about how to create a heat map for WiFi to better see your coverage at a glance.
The SSID vs. BSSID Puzzle
Your scan results will list both an SSID and a BSSID for every network it finds. Knowing the difference between them is crucial for troubleshooting.
The SSID (Service Set Identifier) is simply the public name of the Wi-Fi network. It’s the name you see on your phone, like "HotelGuestWiFi" or "OfficeNet".
The BSSID (Basic Service Set Identifier), on the other hand, is the unique MAC address of an individual access point's radio. Think of the SSID as a hotel chain's brand name and the BSSID as the specific address of one of their hotels.
In a large space like an office or hotel, you should expect to see one SSID but many different BSSIDs associated with it. This is a good sign! It means multiple APs are working together under one network name to provide seamless coverage for roaming. If you spot an unexpected BSSID broadcasting your SSID, however, that’s a major red flag for a potential rogue AP.
Understanding the BSSID is your secret weapon for physical AP identification. When you find a problem area, noting the BSSID of the dominant AP tells you exactly which piece of hardware you need to go and investigate.
Visualising Channel Overlap
Channel overlap is one of the biggest culprits behind sluggish Wi-Fi, especially on the crowded 2.4 GHz band. This band effectively has only three non-overlapping channels: 1, 6, and 11. When nearby APs are configured to use adjacent channels (like 2 and 3), they interfere with each other, just like two people trying to talk over each other in a small room.
A good Wi-Fi scan tool will visualise this for you, showing which channels are in use and how much their signals are clashing. If you see your APs crowded onto the same or adjacent channels, your next step is clear: reconfigure them to use only channels 1, 6, and 11. This single change can have a massive positive impact on network stability and performance.
Checking Security at a Glance
Finally, a quick scan is the fastest way to audit the security of every network within range. Your scanning tool will list the security protocol used by each SSID, letting you spot vulnerabilities in seconds.
Here’s what to look for:
- Open: No encryption whatsoever. A huge security risk that should be avoided.
- WEP: Obsolete and easily cracked in minutes. If you see this, it’s a critical risk.
- WPA/WPA2-PSK (TKIP/AES): WPA is outdated. WPA2 with AES is a common minimum standard, but it’s been superseded.
- WPA3: This is the modern security standard, offering far more robust protection.
If your own network is still using WPA, or worse, has an "Open" guest network, you've found a critical security gap. Closing it is an easy win for hardening your entire wireless environment.
Turning Scan Data into Secure Guest Access
This is where the rubber meets the road. All that careful scanning and data collection now pays off, helping you build a genuinely great user experience. After all, even the most advanced guest access portal is useless if the network it runs on is flaky. Launching a guest Wi-Fi service without first checking your RF environment is like building on sand—it's just asking for trouble down the line.
Your scan results are your final quality assurance check before you flip the switch. If your scans show heavy channel congestion, now is your last chance to sort it out. Pushing a guest portal live on a network struggling with interference is a guaranteed recipe for a flood of complaints from frustrated users who can't get online or keep a stable connection.
Building on a Clean RF Foundation
A clean, stable radio frequency environment is the absolute baseline for any successful guest access deployment. This means you've already taken your scan data and put it to work, tackling the big issues before they become user-facing problems.
Before moving forward, you should have already:
- Resolved Channel Overlap: Your APs should be set to non-overlapping channels (sticking to 1, 6, and 11 on the 2.4 GHz band) to cut down co-channel interference.
- Optimised AP Transmit Power: You've tweaked power levels to create sensible cell sizes, which reduces signal bleed and stops your APs from shouting over each other.
- Mapped and Filled Coverage Gaps: You've walked the floor and made sure there are no dead zones where a guest's connection could drop, paying special attention to high-traffic spots like lobbies, meeting rooms, or shop floors.
Once this RF groundwork is solid, you can be confident that the network itself isn’t going to be the source of performance headaches. This frees you up to concentrate on crafting a great guest experience, rather than fighting basic connectivity fires.
A professional Wi-Fi scan does more than just spot problems; it certifies that your network is ready for action. It’s the green light, confirming your infrastructure can handle the demands of a high-performance, identity-based access solution.
From Security Audit to Secure Access
One of the most valuable outputs from your Wi-Fi scan is the security audit it effectively performs. Finding and eliminating rogue APs is a vital checkpoint before you introduce any kind of guest or staff network. A single rogue device can punch a hole straight through your security policies, creating a massive risk.
Think of your scan as a security patrol. By comparing the BSSIDs you've detected against your own inventory of authorised devices, you can quickly pinpoint and remove any unauthorised hardware plugged into your network. Only when you've confirmed your airspace is clean should you even consider deploying an identity-based system.
This security-first mindset is essential. When you start enabling powerful features like passwordless access or certificate-based authentication, you are placing a huge amount of trust in your underlying network. Your Wi-Fi scan is the tool that validates that trust, making sure there are no backdoors left open.
Informing AP Placement for Seamless Roaming
Finally, your scan data is absolutely crucial for optimising the physical placement of your access points. Getting AP placement right is the secret to seamless roaming, which is a must-have for modern technologies like Passpoint and OpenRoaming.
As a person moves through your venue, their device needs to hand off its connection from one AP to the next without dropping a single packet. A Wi-Fi scan helps you nail this by:
- Validating Signal Overlap: It lets you see if you have enough signal overlap (around -67 dBm) between adjacent APs to make that handoff smooth.
- Pinpointing Roaming Boundaries: You can see precisely where a device is likely to jump from one AP to another, helping you fine-tune placement for better performance.
- Ensuring Consistent Coverage: It confirms that your signal strength stays above the necessary threshold (e.g., -70 dBm) everywhere a guest might wander.
This level of detailed planning ensures a fluid user journey, free from the annoying connection drops that plague poorly designed networks. It’s this attention to detail, backed by a professional Wi-Fi scan, that elevates a guest network from just functional to truly exceptional. For more practical advice on delivering a first-class connection, check out our guide to providing Wi-Fi for guests . This is how you transform your network into an intelligent asset, ready for the demands of modern, identity-driven connectivity.
Answering Your Wi-Fi Scan Questions
When you start digging into Wi-Fi scans, it's easy to end up with more questions than answers. Even experienced IT pros can get tripped up on the best way to scan or what the results actually mean. Let's walk through some of the most common questions and give you clear, straightforward answers to help you get the most out of your scans.
How Often Should I Run a Wi-Fi Scan?
This is one of the first questions people ask, and the honest answer is: it depends entirely on your environment. There’s no single schedule that fits everyone.
For a really dynamic space like a hotel, a busy retail centre, or a co-working office, a quarterly scan is a good starting point. This frequency helps you catch new sources of interference or unauthorised devices before they start causing real headaches for your users.
In a more static environment, like a standard corporate office where the layout and number of devices don't change often, a full Wi-Fi scan every six to twelve months is usually enough. Think of it as a routine health check to make sure everything is still running smoothly.
That said, there are times you absolutely must run a fresh scan, no matter when your last one was. Always perform a scan:
- After any major physical changes to the building, like new walls or office reconfigurations.
- Following the deployment of new access points or a big network hardware upgrade.
- Whenever users start reporting widespread or persistent connectivity problems.
Your scheduled scans are for preventative maintenance; these event-triggered scans are for immediate diagnosis.
The rule of thumb is simple: when in doubt, scan. The data you get from a five-minute scan can save you hours of guesswork and troubleshooting down the line.
My Scan Shows Channel Overlap, What Now?
Seeing a lot of channel overlap in your scan results is a very common problem, but it’s one you need to take seriously. It’s one of the biggest causes of poor Wi-Fi performance, especially on the congested 2.4 GHz band.
Your first move should be to manually configure your access points to use only the non-overlapping channels: 1, 6, and 11. This is the foundational step to creating a stable 2.4 GHz network.
If your network hardware supports it, turn on any automatic channel selection features. These systems constantly monitor the airwaves and shift channels to minimise interference automatically. It’s a great feature, but a manual check is still a good idea to ensure it's working as expected.
Next, you want to get as many devices as possible onto the 5 GHz band. This band has far more non-overlapping channels and is generally much less crowded. Features like "band steering," which is standard on most enterprise-grade APs, can automatically nudge dual-band devices over to 5 GHz, freeing up precious space on the 2.4 GHz band.
Finally, you might want to consider turning down the transmit power on some of your APs. It sounds counter-intuitive, but max power isn't always the best setting. By shrinking the signal area of each AP, you reduce how much they "shout" over each other, which can dramatically improve overall network performance in dense areas.
What Is a Rogue AP and How Do I Find One?
A rogue AP is an unauthorised access point that someone has physically plugged into your secure network, and it represents a massive security hole. It creates a backdoor that completely bypasses your firewall and other security measures, allowing anyone in wireless range to potentially get onto your internal network.
Finding a rogue AP with your Wi-Fi scan takes a bit of detective work. You must have an accurate, up-to-date inventory of all your authorised APs, paying close attention to their MAC addresses (also known as BSSIDs).
During your scan, you'll get a list of all detected BSSIDs. Your job is to compare this list against your official inventory.
Any access point that is broadcasting your company’s SSID but has a BSSID that isn’t on your authorised list is a potential rogue. While professional tools can help automate this by flagging unknown devices, manually verifying this is a fundamental security task. Once you’ve confirmed a rogue, the priority is to physically find the device and unplug it from your network immediately.
A well-executed Wi-Fi scan is the first step toward a secure, high-performing network. When you're ready to turn that optimised network into an intelligent asset, Purple provides the tools you need. Deploy secure, passwordless authentication for guests and staff, and transform your Wi-Fi data into actionable insights that drive business growth. Learn more about Purple's identity-based networking platform .